Keil MDK-ARM
Keil MDK is a visual Studio style, commercial toolchain including a non-GCC compiler. We recommend to always install the latest J-Link software and documentation pack to make sure that Keil MDK uses the latest J-Link DLL.
Contents
Using J-Link with an existing project
- Open the project to configure
- Select Project | Options for Target ... from the main menu
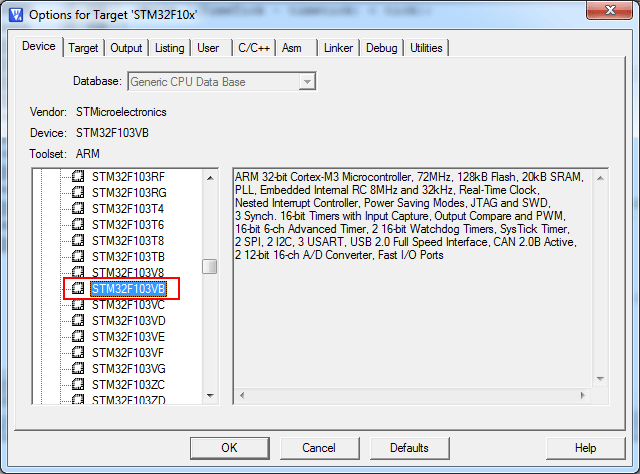
- Click the Device tab and select the proper device
- Click on the Debug tab and make sure that Cortex-M/R J-LINK / J-Trace is selected
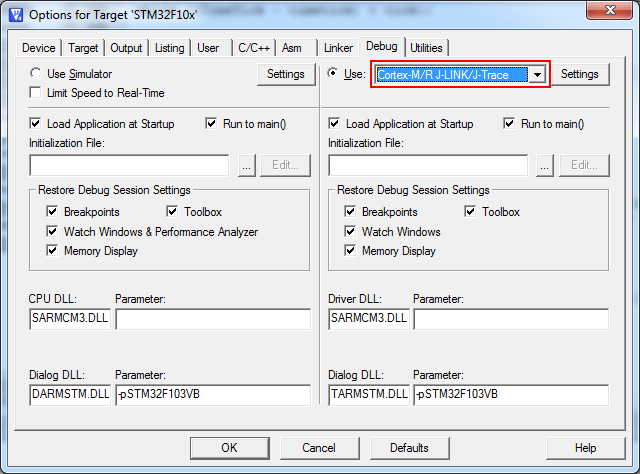
- In order to modify J-Link specific settings click the Settings button in the debug menu and a new dialog will show up:
- Now the project is ready to be debugged with J-Link / J-Trace.


Using J-Link Flashloader
First, choose the right device in the project settings if not already done:
- Click Project | Options for Target from the main menu
- Switch to the Device tab
- Select the appropriate device, for example STM32F207IG

Secondly, enable SEGGER flash loader:
- Click Project | Options for Target from the main menu
- Switch to the Utilities tab
- Check Use Target Driver for Flash Programming
- Select J-LINK / J-Trace Cortex in order to use the J-Link built-in flashloader

Thirdly, configure flash loader:
- Click Project | Options for Target from the main menu
- Switch to the Debug tab
- Select J-LINK / J-Trace Cortex

- Click Settings
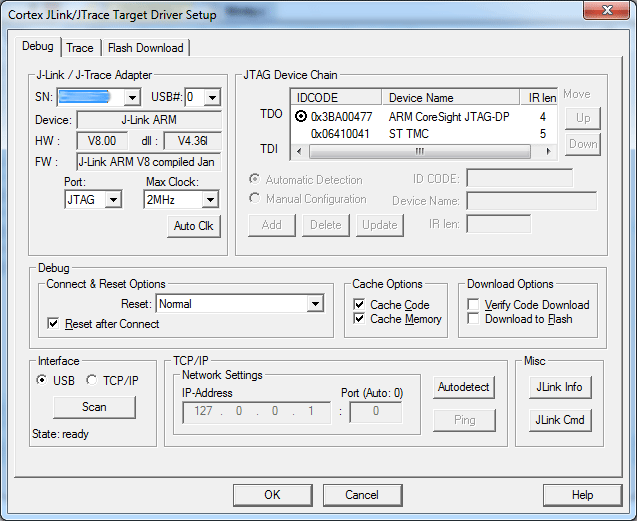
- Check Verify Code Download and Download to Flash as shown in the screenshot below

- Please note that flash download through the "Download" (F8) is not supported for J-Link right now.
- Support may be added in future versions of Keil MDK.
Using J-Link Script Files
Keil MDK-ARM does not provide any native support for J-Link script files so usage of them cannot be configured from within the GUI of the IDE itself. Anyhow, it is possible to use a J-Link script file by making use of the auto-search feature of the DLL:
- Navigate to the folder where the uVision project (*.uvproj, *.uvprojx) is located that shall use the script file.
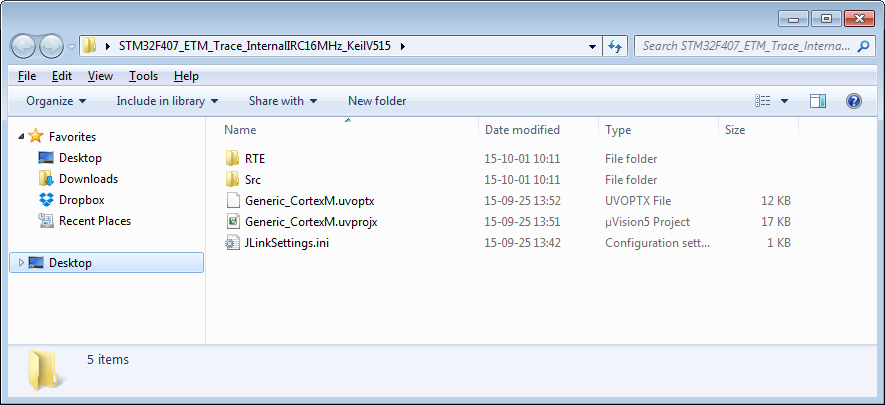
- Copy the J-Link script file to there
- Rename the J-Link script to JLinkSettings.JLinkScript
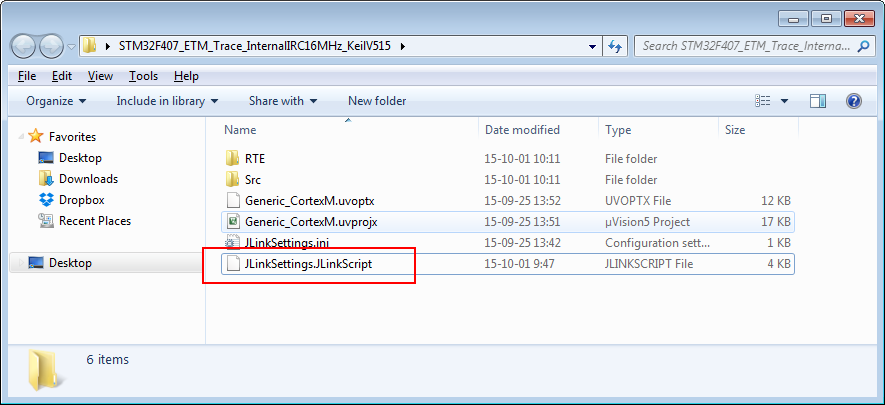


The JLinkSettings.ini is a settings file created by the J-Link DLL on debug session start. If no script file is explicitly passed to the DLL, it will search in the directory of the JLinkSettings.ini for a script file named like the settings file only with a different file extension.
Trace support
Keil MDK supports various kinds of tracing features. A general overview of the different trace types can be found here.
Since V5.30 of the MDK-ARM the following features are supported:
- SWO trace with J-Link and J-Trace debug probes.
- General native Support for ETB and MTB tracing with J-Link and J-Trace debug probes.
- Support for ETMv3 tracing (e.g. Cortex-M4) with J-Trace debug probes.
- Support for ETMv4 tracing (e.g. Cortex-M7 targets) with J-Trace debug probes.
- The Code coverage feature only shows case detection inside of the Disassembly Window. All other windows only show whether the code was executed or not.
- For the best trace experience and the full usage of all features of the J-Trace, it is recommended to use Ozone.
Configure µVision for 4-Pin Trace with J-Trace
To configure trace in µVision, an .ini file has to be created for the device to be traced:
- .ini file for STM32F2/STM32F4: STM32F429.ini
- .ini file for LPC4357: LPC4357.ini
Set the file as initialization file
- Open the dialog "Options for Target - Debug".
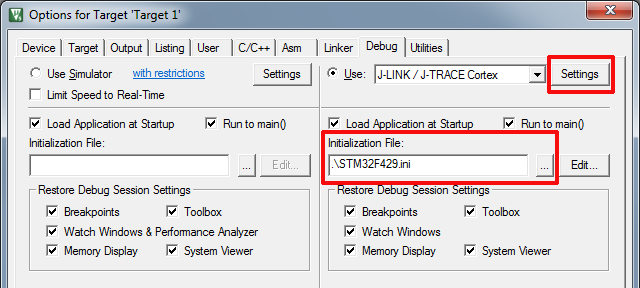
- Set the created file as Initialization File.

Configure µVision for ETM trace
- Click Settings to open the "Target Driver Setup" dialog.
- Click the Trace tab.
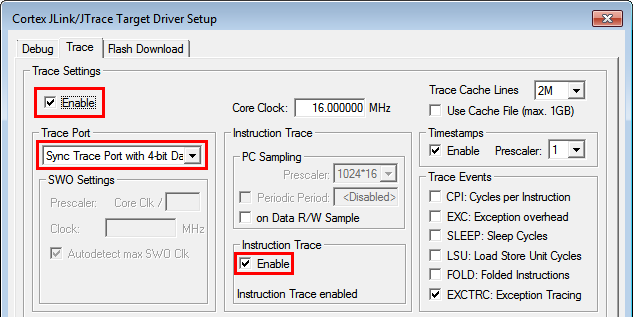
- Set Enable and ETM Trace Enable.
- Set Trace Port to "Sync Trace Port with 4-bit Data".
- Start the debugging session and open an "Instruction Trace" window.

Sample project files
Trace support before V5.30 of the Keil MDK-ARM
- Full support for SWO trace J-Link and J-Trace debug probes.
- MTB(partially)/ETM trace is supported for Cortex-M0, M0+, M3 and M4.
RTT in uVision
Generally if you want to use RTT in Keil all you need to do is add the RTT sources to your project as explained in the J-Link user manual. You can now use the RTT API directly in your application and send data back and forth between target and host PC.
Using syscalls like printf with RTT
If you want to retarget e.g. printf to use RTT, additional steps are necessary. First add also the corresponding syscalls file to your application. Additionally enable STDOUT retargeting via the "Manage Run-Time Environment" button:
![]()
Now select STDOUT and set it to Variant User:

After that your project should build and you can use printf via RTT in your application. To display the messages you can use the J-Link RTT Viewer for example which is part of the J-Link software package.
RTT ASM support
Support for SEGGER_RTT_ASM_ARMv7M.S is available when using "armclang" as assembler. This option is only available when using ARM compiler 6 or later in Keil MDK-ARM.


printf via SWO in uVision
To reroute your printf calls to SWO the following settings must be set in Keil uVision:
- Debug interface must be SWD.
- Enable Trace in project options under Debug->Use J-LINK/J-TRACE Cortex->Settings->Trace->Enable
- In the same menu set "Trace Port" to "Serial Wire Output - UART/NRZ"
- In the same menu set "Core Clock" to the clock speed the TPIU is clocked at. Usually that equals the CPU clock speed.
- Press OK and save the settings. The resulting settings should look like this:

- Now press the "Manage Run-Time Environment" button.
![]()
- Now set Compiler->I/O->STDOUT to ITM and activate the check box.
- Rebuild your code.
Now your printf calls in your application should be routed via the SWO pin.