emWin headless VNC server
emWin offers a VNC server add-on which allows the user to remote control their GUI application. The VNC server will also work on devices which do not have a display attached. This tutorial will demonstrate how to set up a headless (without an LCD) VNC server on a STM32F746G Discovery.
Contents
Preparation
This tutorial uses a STM32F746G Discovery and the ready to use SEGGER evaluation package which can be downloaded here. We will use this package since it includes not only emWin but also emNet which is required to set up a VNC connection.
The evaluation package is made for Embedded Studio which can be downloaded here.
Furthermore, you will need a VNC client. This can be any VNC client or our own from SEGGER which can be found here.
What it does
Typically emWin is used to create a graphical user interface on devices with a display attached to. With the VNC add-on emWin allows the user to remote control the UI.
The VNC server of emWin simply reads the frame buffer and sends the changed area to a connected client. This does not require a physical display nor an LCD controller. So, it is possible to set up a GUI application and control it through a VNC connection.
To run the VNC Server, we only need a piece of memory being used as frame buffer. emWin will use the GUIDRV_Lin driver to write into this frame buffer. The VNC server will recognize any changes within this buffer and send the changed data to the connected client.
Getting started
Extract the evaluation package and open the Embedded Studio project file.
LCD configuration
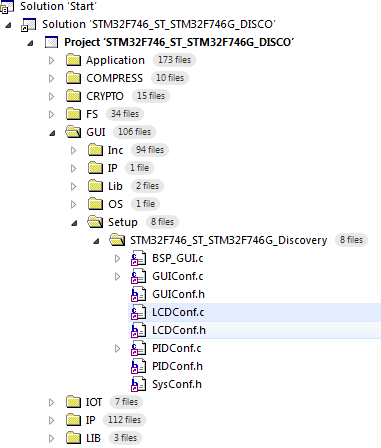
Open the LCDConf.c found under GUI\Setup\STM32F746_ST_STM32F746G_Discovery as seen on the right.
Since we don't want to use a display but the STM32746G Discovery has one attached we simply remove any hardware specific code.
The only things left should be the functions LCD_X_DisplayDriver() and LCD_X_Config() as well as a static array being used as frame buffer.
#include "GUI.h"

#include "GUIDRV_Lin.h"

/*********************************************************************
*
*       Layer configuration (to be modified)
*
**********************************************************************
*/
//
// Physical display size
//
#define XSIZE_PHYS 480
#define YSIZE_PHYS 272

//
// Color conversion
//
#define COLOR_CONVERSION GUICC_M8888I

//
// Display driver
//
#define DISPLAY_DRIVER GUIDRV_LIN_32

/*********************************************************************
*
*       Configuration checking
*
**********************************************************************
*/
#ifndef   VRAM_ADDR
  #define VRAM_ADDR _aVRAM0
#endif
#ifndef   XSIZE_PHYS
  #error Physical X size of display is not defined!
#endif
#ifndef   YSIZE_PHYS
  #error Physical Y size of display is not defined!
#endif
#ifndef   COLOR_CONVERSION
  #error Color conversion not defined!
#endif
#ifndef   DISPLAY_DRIVER
  #error No display driver defined!
#endif

/*********************************************************************
*
*       Static data
*
**********************************************************************
*/
static U8 _aVRAM0[XSIZE_PHYS * YSIZE_PHYS * 4] __attribute__ ((section (".GUI_RAM")));

/*********************************************************************
*
*       Public code
*
**********************************************************************
*/
/*********************************************************************
*
*       LCD_X_Config
*
* Purpose:
*   Called during the initialization process in order to set up the
*   display driver configuration.
*
*/
void LCD_X_Config(void) {
  //
  // Set display driver and color conversion for 1st layer
  //
  GUI_DEVICE_CreateAndLink(DISPLAY_DRIVER, COLOR_CONVERSION, 0, 0);
  //
  // Display driver configuration
  //
  if (LCD_GetSwapXY()) {
    LCD_SetSizeEx (0, YSIZE_PHYS, XSIZE_PHYS);
    LCD_SetVSizeEx(0, YSIZE_PHYS, XSIZE_PHYS);
  } else {
    LCD_SetSizeEx (0, XSIZE_PHYS, YSIZE_PHYS);
    LCD_SetVSizeEx(0, XSIZE_PHYS, YSIZE_PHYS);
  }
  LCD_SetVRAMAddrEx(0, (void *)VRAM_ADDR);
}

/*********************************************************************
*
*       LCD_X_DisplayDriver
*
* Purpose:
*   This function is called by the display driver for several purposes.
*   To support the according task the routine needs to be adapted to
*   the display controller. Please note that the commands marked with
*   'optional' are not cogently required and should only be adapted if
*   the display controller supports these features.
*
* Parameter:
*   LayerIndex - Index of layer to be configured
*   Cmd        - Please refer to the details in the switch statement below
*   pData      - Pointer to a LCD_X_DATA structure
*
* Return Value:
*   < -1 - Error
*     -1 - Command not handled
*      0 - Ok
*/
int LCD_X_DisplayDriver(unsigned LayerIndex, unsigned Cmd, void * pData) {
  int r;

  switch (Cmd) {
  //
  // Required
  //
  case LCD_X_INITCONTROLLER: {
    //
    // Just return 0 to indicate LCD controller set up has been done
    //
    return 0;
  }
  default:
    r = -1;
  }
  return r;
}
The function LCD_X_DisplayDriver() does nothing more than indicating that the LCD controller has been initialized by return 0 on LCD_X_INITCONTROLLER.
The function LCD_X_Config() simply sets up the GUIDRV_Lin driver and passes the frame buffer address to emWin.
GUI application
Within the GUI application we need to set up an IP connection and draw something with emWin, just as we would do with a display.
Start two IP tasks, one IP-main task and a receive task. You don't have to bother about its content because it is part of the emNet library.
  IP_Init();
  IFaceId = IP_INFO_GetNumInterfaces() - 1;  // Get the last registered interface ID as this is most likely the interface we want to use in this sample.
  //
  // Start TCP/IP task
  //
  OS_CREATETASK(&_TCB,       "IP_Task",     IP_Task,              TASKPRIO_IPMAIN,  _aStack);
  OS_CREATETASK(&_IPRxTCB,   "IP_RxTask",   IP_RxTask,            TASKPRIO_IPRX,    _aIPRxStack);   // Start the IP_RxTask, optional.
  IP_Connect(IFaceId);                                                                              // Connect the interface if necessary.
  while (IP_IFaceIsReady() == 0) {
    GUI_X_Delay(5);
  }
Once IP_IFaceIsReady() indicates a working connection we can start the VNC server and draw something into the frame buffer. The drawing operation is performed in the callback function of the background window.
  //
  // Start VNC server
  //
  GUI_VNC_X_StartServer(0, 0);
  //
  // Set a callback function for the back ground window
  //
  WM_SetCallback(WM_HBKWIN, &_cbBk);
static void _cbBk(WM_MESSAGE * pMsg) {
  int xPos;
  int yPos;

  switch (pMsg->MsgId) {
  case WM_PAINT:
    //
    // Display something
    //
    GUI_SetBkColor(GUI_BLACK);
    GUI_Clear();
    xPos = LCD_GetXSize() >> 1;
    yPos = LCD_GetYSize() >> 1;
    GUI_SetFont(&GUI_Font20_1);
    GUI_SetTextAlign(GUI_TA_HCENTER | GUI_TA_VCENTER);
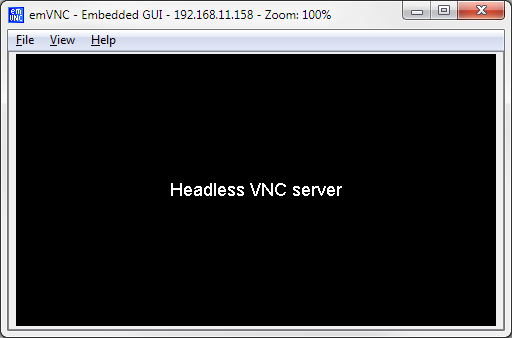
    GUI_DispStringAt("Headless VNC server", xPos, yPos);
    break;
  default:
    WM_DefaultProc(pMsg);
    break;
  }
}
Once done compile and download the application to the STM32F746G Discovery and connect an Ethernet cable. As soon as the IP connection has been established you can get the IP address from the Debug Terminal (only in debug builds) of Embedded Studio.
As soon as the connection is set up you can use the IP address to connect the VNC client to the server.
The final LCD configuration and the GUI application can be downloaded here.
There is also a demo available for the emPower-USB-Host board utilizing Ethernet-over-USB.


