Difference between revisions of "Atmel Studio"
(Created page with "In order to use J-Link with '''Atmel Studio''', usually it is not necessary to separately install the [https://www.segger.com/downloads/jlink/ J-Link software and documentatio...") |
|||
| Line 6: | Line 6: | ||
* Open the project to configure |
* Open the project to configure |
||
| − | * Click Project | Properties from the main menu |
+ | * Click '''Project | Properties''' from the main menu |
| − | * Click the Tool tab and select J-Link |
+ | * Click the '''Tool''' tab and select '''J-Link''' |
* Make sure that the appropriate target interface (JTAG / SWD / ...) is selected |
* Make sure that the appropriate target interface (JTAG / SWD / ...) is selected |
||
* Make sure that a proper target interface speed is selected (4 MHz works for almost all Cortex-M based targets and leads to good performance) |
* Make sure that a proper target interface speed is selected (4 MHz works for almost all Cortex-M based targets and leads to good performance) |
||
| Line 13: | Line 13: | ||
[[File:Atmel_Studio_Tutorial_1.png]] |
[[File:Atmel_Studio_Tutorial_1.png]] |
||
| − | * Click Build | Build Solution from the main menu |
+ | * Click '''Build | Build Solution''' from the main menu |
* In order to start a debug session, click Start Debugging and Break. |
* In order to start a debug session, click Start Debugging and Break. |
||
Latest revision as of 16:49, 9 October 2020
In order to use J-Link with Atmel Studio, usually it is not necessary to separately install the J-Link software and documentation package. Anyhow, we recommend to make sure that the latest version of the J-Link software is installed and the DLL in Atmel Studio is updated to the latest version. Atmel Studio comes with a lot sample projects for various eval boards.
Using an Atmel Studio project with J-Link
The following steps explain how to configure a project to be used with J-Link.
- Open the project to configure
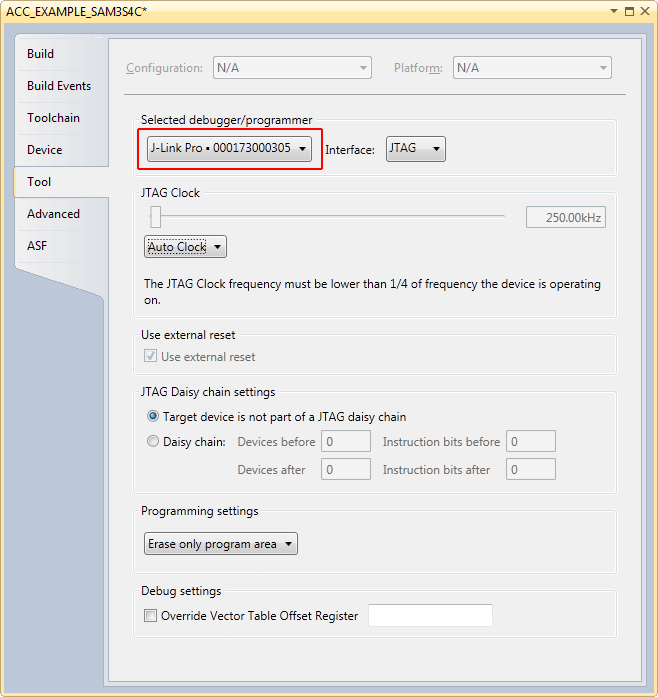
- Click Project | Properties from the main menu
- Click the Tool tab and select J-Link
- Make sure that the appropriate target interface (JTAG / SWD / ...) is selected
- Make sure that a proper target interface speed is selected (4 MHz works for almost all Cortex-M based targets and leads to good performance)
- Click Build | Build Solution from the main menu
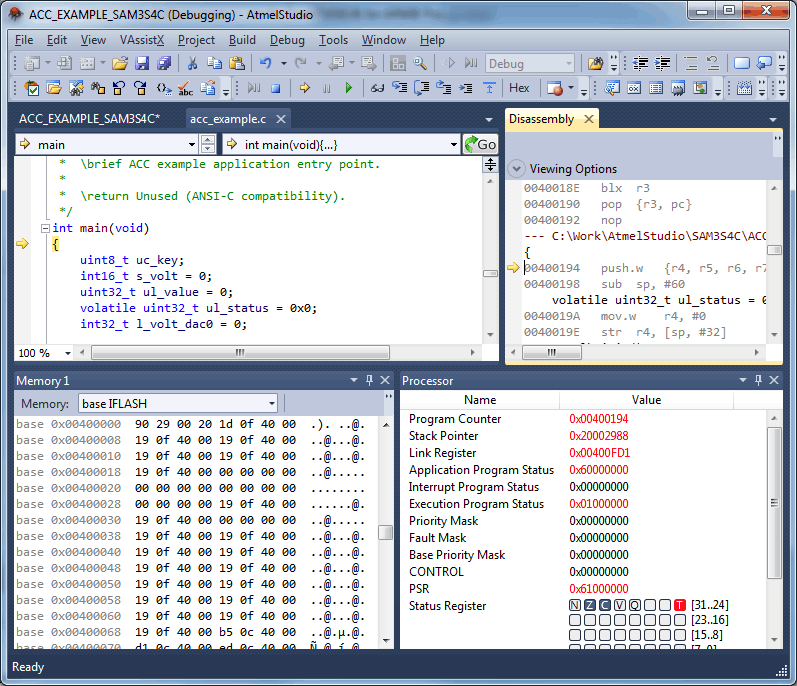
- In order to start a debug session, click Start Debugging and Break.
- Now the project is ready to be debugged with J-Link / J-Trace.

