How to create a custom ESPRO BSP
This article contains a guide that explains how to create a custom ESPRO Board Support Package based on a CPU Support Package. In this example we will create an embOS project, later other SEGGER software can be added as well.
Contents
Setup
The following tutorial will be based on the following Hardware and Software combinations:
- SEGGER Embedded Studio v6.32b or later
- SEGGER Embedded Studio Pro v2.58 or later
- SystemView, Target Sources v3.32 or later
- Example application and main.c for testing purpose
Tutorial
This tutorial will be explain how to create a custom embOS board support package. To make this tutorial easier, a few terms need to be defined first:
- SolutionDir = The SolutionDir means the folder that contains the emProject file.
- ESPRODir = The ESPRO package folder, found in Embedded Studio under File->Open Studio Folder->Packages Folder.
- Start Embedded Studio
- Install CPU support Package for your device family via Tools->Package Manager.
- Create new project via
File->New Project->Create the project in a new solution. - Select the "A C/C++ executable for..." from the corresponding package. Press Next, select your target device and keep pressing Next until your project is finished.
- Now activate the embOS and SEGGER library in the project options:
Project Settings->ES PRO Cortex-M->embOS->Add embOS = Yes.Project Settings->ES PRO Cortex-M->SEGGER->Add SEGGER library = Yes.
- After activating the libraries open the
SolutionDir. - Create two folders called
OSandSEGGER, after that open theOSfolder. - Create two more folders in it named
SetupandGeneric. - Go back to the
SolutionDirand open theSEGGERfolder. - Create a folder named
Genericin it. - Now open the
ESPRODirand navigate toSEGGER->Generic. - Copy the following files into
SolutionDir->SEGGER->Generic:- SEGGER_RTT.c
- SEGGER_SYSVIEW.c
- SEGGER_SYSVIEW_embOS.c
- SEGGER_RTT_ASM_ARMv7M.S
- Also copy SEGGER_SYSVIEW_CONF.h from
ESPRODir->SEGGER->Inc toSoluionDir->SEGGER->Generic. - Unzip the downloaded SystemView, Target Sources to any location.
- Open the unzipped files and navigate to
Sample->embOS->Config->Cortex-M. - Copy SEGGER_SYSVIEW_Config_embOS.c into
SolutionDir->SEGGER->Generic - Now navigate to
SolutionDir->OS->Genericand copy the following files fromESPRODir->OS->Generic:- JLINKMEM_Process.c
- OS_Error.c
- OS_ThreadSafe.c
- After that create a RTOS Init file in
SolutionDir->OS->Setup, how to create a RTOS init file can be found here: https://www.segger.com/doc/UM01076_embOS_Ultra.html#Board_Support_Packages - Go back to Embedded Studio and open the project settings.
- Switch to the common build configuration and navigate to
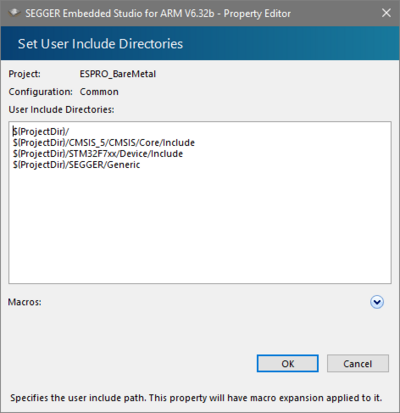
Code->Preprocessor->User Include Directories - After that add the following User Include Directories:
- $(ProjectDir)/
- $(ProjectDir)/CMSIS_5/CMSIS/Core/Include
- $(ProjectDir)/STM32F7xx/Device/Include
- $(ProjectDir)/SEGGER/Generic
- Drag and Drop the SEGGER and OS Folder from your
SolutionDirinto the project window of Embedded studio. - Activate in both folders Recurse into subdirectories via
Right click on the folder->Code->Folder->Dynamic Folder Recurse->Recurse into subdirectories. - Close the options window and synchronize both folder with disk via
Right click->Synchronize with disk. - Drag an Drop both files of the downloaded files on top of the article into your SolutionDir.
- Drag and Drop both files of the downloaded files on top of the article into your virtual source folder in Embedded Studio.
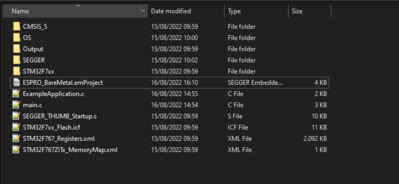
- The SolutionDir should now look as follows
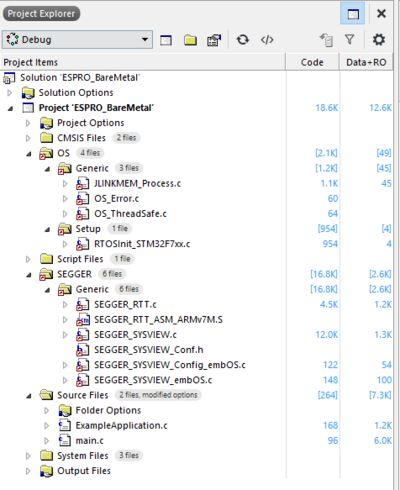
- The ES project explorer should now look as follows:
- Now build the project and start the debug session.
If everything works fine, two console outputs will be printed successively.


