Difference between revisions of "J-Link Configurator"
(Created page with "'''<span style="color:red">This article is still under construction. For any missing sections/chapters please refer to the PDF version of the J-Link User Manual (UM08001).'''") |
(→Configure J-Links using the J-Link Configurator) |
||
| (3 intermediate revisions by 2 users not shown) | |||
| Line 1: | Line 1: | ||
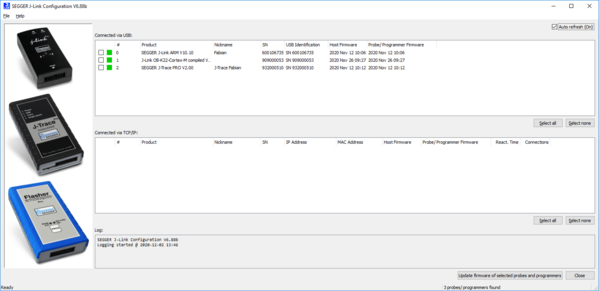
| + | [[File:JLinkConfigurator_MainWindow.PNG | thumb | right | 600px | J-Link Configurator - Main window]] |
||
| − | '''<span style="color:red">This article is still under construction. For any missing sections/chapters please refer to the PDF version of the J-Link User Manual (UM08001).''' |
||
| + | The J-Link Configurator is a cross platform (Windows, Linux and MacOS) GUI application to configure certain features of a J-Link, J-Trace or Flasher. |
||
| + | It is part of the [[UM08001_J-Link_/_J-Trace_User_Guide#J-Link_Software_and_Documentation_Pack | J-Link Software and Documentation Pack]] |
||
| + | available on the [https://www.segger.com/downloads/jlink#J-LinkSoftwareAndDocumentationPack SEGGER Homepage]. |
||
| + | |||
| + | <div class="toclimit-3"> |
||
| + | __TOC__ |
||
| + | </div> |
||
| + | <br clear=all> |
||
| + | |||
| + | == Features == |
||
| + | In most cases, no configuration is required, especially when using J-Link via USB, as it is designed to work out-of-the-box. |
||
| + | If required, the following settings can be changed via the J-Link Configurator: |
||
| + | * Re-configuring older J-Links to be identified by their real serial number when enumerating on the host PC (required when connecting > 3 older J-Links to one host pc) |
||
| + | * Configuration of the IP settings (use DHCP, IP address, subnet mask, ...) of a J-Link supporting the Ethernet interface |
||
| + | * Enabling/Disabling VCOM functionality, if supported. |
||
| + | * Updating the firmware of multiple emulators connected via USB or TCP/IP easily. |
||
| + | * Adding a nickname to an emulator. |
||
| + | <!--- TO BE DONE: * Resetting unlock dialog setting (see [[Unlock Dialog]]). ---> |
||
| + | |||
| + | == Configure J-Links using the J-Link Configurator == |
||
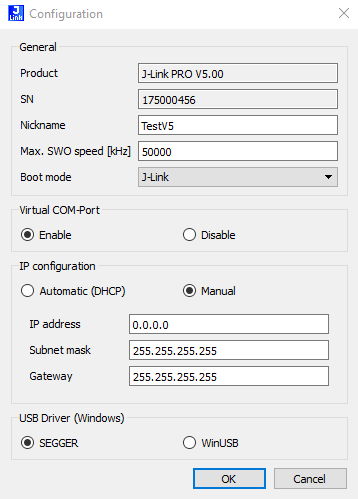
| + | [[File:JLinkConfigurator_ConfigDialog.PNG | thumb | right | 600px | J-Link Configurator - Configuration dialog]] |
||
| + | A J-Link can be configured easily by selecting the appropriate J-Link from the emulator list and using right click -> Configure or double-clicking it. |
||
| + | |||
| + | === Configuring DHCP and IP === |
||
| + | This feature is only available for emulators (e.g J-Link) with an Ethernet interface. |
||
| + | To manually configure the IP settings of the connected emulator, under '''IP Configuration''' click on '''Manual'''. |
||
| + | |||
| + | === Enabling/Disabling VCOM === |
||
| + | To configure VCOM, click on "Enable VCOM" (requires emulator reset) |
||
| + | |||
| + | === Adding a Nickname === |
||
| + | A nickname can be assigned to a connected emulator to make it easier to recognize. |
||
| + | This nickname will also be shown in the device selection dialog. |
||
| + | |||
| + | === Configuring Bootmode === |
||
| + | To configure Boot mode for J-Link, selcet "J-Link" (requires emulator reset)<br /> |
||
| + | To configure Boot mode for CMSIS, selcet "CMSIS" (requires emulator reset) |
||
| + | |||
| + | <!--- TBD: == Reset Unlock dialog == ---> |
||
Revision as of 11:27, 18 March 2022
The J-Link Configurator is a cross platform (Windows, Linux and MacOS) GUI application to configure certain features of a J-Link, J-Trace or Flasher. It is part of the J-Link Software and Documentation Pack available on the SEGGER Homepage.
Features
In most cases, no configuration is required, especially when using J-Link via USB, as it is designed to work out-of-the-box. If required, the following settings can be changed via the J-Link Configurator:
- Re-configuring older J-Links to be identified by their real serial number when enumerating on the host PC (required when connecting > 3 older J-Links to one host pc)
- Configuration of the IP settings (use DHCP, IP address, subnet mask, ...) of a J-Link supporting the Ethernet interface
- Enabling/Disabling VCOM functionality, if supported.
- Updating the firmware of multiple emulators connected via USB or TCP/IP easily.
- Adding a nickname to an emulator.
Configure J-Links using the J-Link Configurator
A J-Link can be configured easily by selecting the appropriate J-Link from the emulator list and using right click -> Configure or double-clicking it.
Configuring DHCP and IP
This feature is only available for emulators (e.g J-Link) with an Ethernet interface. To manually configure the IP settings of the connected emulator, under IP Configuration click on Manual.
Enabling/Disabling VCOM
To configure VCOM, click on "Enable VCOM" (requires emulator reset)
Adding a Nickname
A nickname can be assigned to a connected emulator to make it easier to recognize. This nickname will also be shown in the device selection dialog.
Configuring Bootmode
To configure Boot mode for J-Link, selcet "J-Link" (requires emulator reset)
To configure Boot mode for CMSIS, selcet "CMSIS" (requires emulator reset)

