NXP KDS
The Kinetis Design Studio software development tool is a GNU/Eclipse-based development environment for Freescale Kinetis devices. It supports Cortex-M based Kinetis devices and integrates with Processor Expert and Kinetis Software Development Kit. KDS supports SEGGER J-Link/J-Trace, P&E USB Multilink Universal/USB Multilink Universal FX and CMSIS-DAP debug adapters and uses the newlib-nano C runtime library. This runtime library helps reduce the memory footprint of an embedded application.
Contents
Using a sample project with J-Link
The following steps assume/expect that basic installation and configuration of KDS and KSDK have already been done. If not done yet, please refer to Installing & Setting up NXP KDS.
- Select File | Import
- Open the General category
- Select Existing Projects in to Workspace
- Click Next
- Enter $KDS_INST_DIR$\NXPKSDK_1.1.0\demos\hello_world\kds\frdmk64f in the Select root directory: field
- Replace frdmk64f by the applicable board name if a different eval board is used
- Build the project
- Now the debug session can be started

If KDS does not create a fitting debug configuration by itself, it might be necessary to create one manually. In oder to do so:
- Open Run | Debug Configurations
- Double-Click GDB SEGGER J-Link Debugging
- Configure the settings according to the device to be debugged
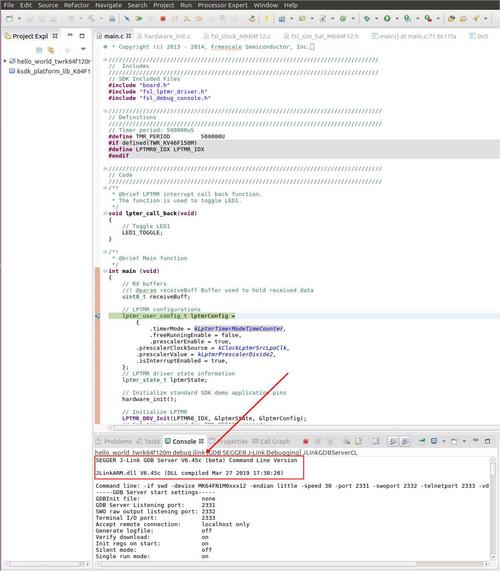
- For reference, a generated debug configration for a FRDMK64f board looks as follows:


Installing & Setting up NXP KDS
- Install KDS
- If another installation type than full installation is chosen, take care that J-Link Support is included in the installation
- Start KDS
- Select a workspace path
- Wait for the Processor Expert Service to finish

- Quit KDS
- Install KSDK
- We will use a sample from this package
- SDK Base is enough for our purposes, however, feel free to choose a richer installation type
- Restart the System
- Start KDS
- Select Help | Install New Software
- In the "Work with:" drop down menu, select "NXP KDS Update Site - https://www.nxp.com/lgfiles/updates/Eclipse/KDS"
- Check Eclipse Update for KSDK 1.0.0-GA
- Check Processor Expert Software
- Check Processor Expert Software - Update for KDS v1.1.x
- Click Next

- Click Next
- Accept the License Agreement and click Finish
- Wait for the installation to finish
- Restart KDS
- Wait for the Processor Export Service to finish.
- There should be an environment variable "KSDK_PATH" set to the installation path of KSDK (default: C:\NXP\KSDK_X.X.X)
- In order to be able to use the sample projects provided by KSDK, the KSDK Platform Driver Library (libksdk_platform.a) needs to be built first.
- Select File | Import
- Open the General category
- Select Existing Projects in to Workspace
- Click Next
- Enter $KDS_INST_DIR$\NXPKSDK_1.1.0\lib\ksdk_platform_lib\kds\K64F12 in the "Select root directory:" field
- Replace K64F12 by the applicable device name if a different device is used
- Check the project found

- Click Finish
- If the welcome page is still present, click go to workbench
- Click the dropdown menu next to the hammer icon
- Choose debug. The debug version of the Platform lib will automatically be build
- Repeat with the release version
- Close the project.
Updating J-Link under NXP KDS (Linux)
Before proceeding please check which Linux (32 or 64 bits) you are using ($ uname -m) and install the according SEGGER J-Link package:
- x86 (release) or later (latest release)(Latest beta)
- x86_64 (release) or later (latest release)(Latest beta)
Once you have the latest J-Link installation open a terminal/console and check that your J-Link installation can be found under /opt/SEGGER/
$ anybody@ubuntu:/$ ls -l /opt/SEGGER/
total 4
lrwxrwxrwx 1 root root   23 Mar 27 09:39 JLink -> /opt/SEGGER/JLink_V645c
drwxr-xr-x 8 root root 4096 Mar 29 00:56 JLink_V645c
Assuming that you installed KDS under the default directory. Create a backup from the provided J-link tools from the IDE (in case you which to restore it later).
$ sudo mv /opt/Freescale/KDS_v3/segger /opt/Freescale/KDS_v3/segger_backup
$ sudo mkdir /opt/Freescale/KDS_v3/segger
Create a soft symlink to the latest SEGGER J-Link installation under KDS installation directory.
$ sudo ln -s /opt/SEGGER/JLink/* /opt/Freescale/KDS_v3/segger
Change/Create link for compatibility with new J-Link installation
$ sudo ln -s /opt/Freescale/KDS_v3/segger/JLinkGDBServerCLExe /opt/Freescale/KDS_v3/segger/JLinkGDBServerCL
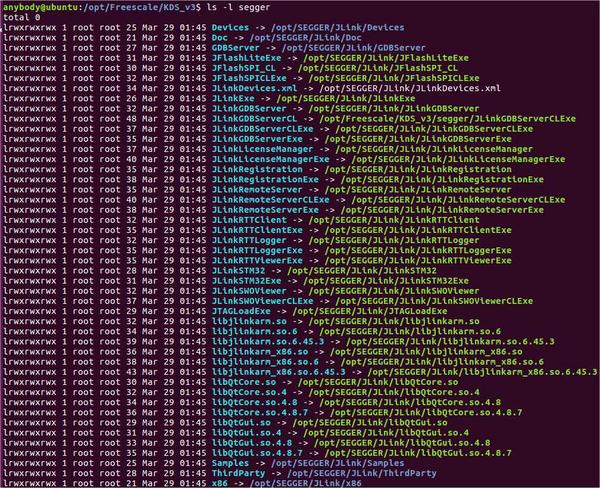
Check that under /opt/Freescale/KDS_v3/segger you should see something like this:
$

Checking that KDS is using the provided J-Link version
$ 

Note: from now on if you wish to use the latest version J-Link you won't need to repeat the above steps. As the /opt/SEGGER/J-Link symlink will be updated by the installer automatically.
Thats it! You are all set to use the latest Segger Jlink under KDS(Linux).
Restore to KDS provided J-Link version
If you wish to retrieve to the KDS provided Jlink version simply remove the link to the directory and restore the backup folder.
$ sudo rm -r /opt/Freescale/KDS_v3/segger
$ sudo mv /opt/Freescale/KDS_v3/segger_backup /opt/Freescale/KDS_v3/segger