Difference between revisions of "Flasher Hub-12"
(→Updating Flasher Hub-12 firmware) |
(→Getting started) |
||
| Line 35: | Line 35: | ||
# Open Flasher Hub-12's web interface by visiting http://flasherhub-<SerialNo>/ (Make sure to replace <SerialNo> with the serial number of your Flasher Hub-12) |
# Open Flasher Hub-12's web interface by visiting http://flasherhub-<SerialNo>/ (Make sure to replace <SerialNo> with the serial number of your Flasher Hub-12) |
||
# Flasher Hub-12 is now up and running |
# Flasher Hub-12 is now up and running |
||
| + | |||
| + | = Power supply = |
||
| + | |||
| + | [[File: SEGGER_Flasher-Hub12_Host-Connector.png | 400px | float | right | Flasher Hub-12 back panel]] |
||
| + | |||
| + | Flasher Hub-12 is powered via the '''POWER''' connector on the back panel.<br> |
||
| + | The power supply must be able to supply 8 - 30 V DC, max. 60 W to Flasher Hub-12. |
||
| + | <br clear="all"> |
||
| + | {{Note|1= |
||
| + | * The power supply powers Flasher Hub-12 itself as well as all connected modules. |
||
| + | * An insufficient power supply may lead to undefined behavior of Flasher Hub-12. |
||
| + | }} |
||
= Firmware update = |
= Firmware update = |
||
Revision as of 13:30, 19 October 2023

This is the user documentation for owners of a SEGGER Flasher Hub-12.
This article is work in progress.
Contents
How Flasher Hub-12 works
Flasher Hub-12 makes ultra-fast high speed parallel programming ("gang programming") with up to 12 channels possible. Flasher Hub-12 is connected to one or more modules (Flasher Compact). Each module is connected to a target chip. Using one of the Flasher Hub-12's host interfaces, flash programming operations can be triggered and responses from the Flasher Hub-12 can be read and evaluated. This makes the Flasher Hub-12 a perfect fit for small-scale as well as large-scale production environments.
Getting started
Before putting the Flasher Hub-12 into operation, make sure to have the following devices at hand:
- Power supply (see below for more information)
- One or more Flasher Compacts
- Ethernet cable (not mandatory)
- PC (Windows/ Linux/ macOS)
- The Flasher Hub-12 is set up and good-to-go in less than 10 minutes
After making sure that the devices mentioned above are all available, the Flasher Hub-12 can be setup:
- Connect Flasher Hub-12 to power supply via the POWER connector
- Connect Flasher Hub-12 to LAN via the LAN connector
- Connect Flasher Compact(s) to Flasher Hub-12 via USB C
- Download and install the most recent version of the Flasher software package
- Make sure Flasher Hub-12 is running the most recent firmware, as described below
- Open Flasher Hub-12's web interface by visiting http://flasherhub-<SerialNo>/ (Make sure to replace <SerialNo> with the serial number of your Flasher Hub-12)
- Flasher Hub-12 is now up and running
Power supply

Flasher Hub-12 is powered via the POWER connector on the back panel.
The power supply must be able to supply 8 - 30 V DC, max. 60 W to Flasher Hub-12.
- The power supply powers Flasher Hub-12 itself as well as all connected modules.
- An insufficient power supply may lead to undefined behavior of Flasher Hub-12.
Firmware update
Firmware update files for both, Flasher Hub-12 as well as Flasher Compact modules are shipped with each new release of the Flasher software package.
Updating Flasher Hub-12 firmware
The Flasher Hub-12 firmware can up updated by using the Flasher software or by using Flasher Hub's web interface.
Using Flasher software

- Make sure to download and install the most recent version of the Flasher software package
- Make sure Flasher Hub-12 is connected to a PC via USB or IP
- Start Flasher Configurator (FlasherConfig.exe)
- Right-click on Flasher Hub-12
- Click "Update firmware"
- Flasher Configurator will now update the firmware of Flasher Hub-12
Using Flasher Hub-12 web interface
- Make sure to download and install the most recent version of the Flasher software package
- Make sure Flasher Hub-12 is connected to LAN
- Open Flasher Hub-12's web interface by visiting http://flasherhub-<SerialNo>/ (Make sure to replace <SerialNo> with the serial number of your Flasher Hub-12)
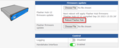
- Navigate to Configuration > Flasher Hub
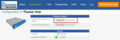
- Next to Flasher Hub-12 firmware update click Choose file
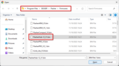
- Navigate to the installation folder of the Flasher software (e.g. C:\Program Files\SEGGER\Flasher)
- Inside the "Firmwares" folder, select the FlasherHub-12_V1.bin
- Click Open
- Click Upload
- Wait for the firmware update file to be processed by Flasher Hub-12
- Reboot Flasher Hub to apply the firmware update
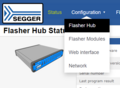
Web interface Configuration > Flasher Hub
Web interface firmware update file upload
Selection of Flasher Hub-12 firmware file
Flasher Hub-12 processing a firmware update file
Web interface following a successful firmware update file upload


Updating module firmware
The firmware of modules connected to the Flasher Hub-12 can be updated as follows.
- Make sure to download and install the most recent version of the Flasher software package
- Make sure Flasher Hub-12 is connected to LAN
- Open Flasher Hub-12's web interface by visiting http://flasherhub-<SerialNo>/ (Make sure to replace <SerialNo> with the serial number of your Flasher Hub-12)
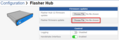
- Navigate to Configuration > Flasher Hub
- Next to Flasher firmware update click Choose file
- Navigate to the installation folder of the Flasher software (e.g. C:\Program Files\SEGGER\Flasher)
- Inside the "Firmwares" folder, select the Flasher_Compact_V*.bin
- Click Open
- Click Upload
- Wait for the firmware update file to be processed by Flasher Hub-12
- Navigate to Status
- In the table below Module Status, select the modules to apply the firmware update to
- Click Update firmwares
Web interface Configuration > Flasher Hub
Web interface module firmware update file upload
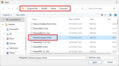
Selection of Flasher Hub-12 module firmware file

Flasher Hub-12 processing a module firmware update file
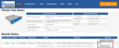
Web interface Status

Web interface while module firmware update is applied
