Difference between revisions of "Read-Modify-Write Flash"
| Line 19: | Line 19: | ||
For the example project the ''SetFlashDLNoRMWThreshold'' value is set to ''0xFFFF'' (64 kB RMW threshold). This means that the J-Link DLL will perform a read-modify-write of flash memory regions <= 64 kB. Make sure you adjust this value depending on the device and sector you are trying to modify. |
For the example project the ''SetFlashDLNoRMWThreshold'' value is set to ''0xFFFF'' (64 kB RMW threshold). This means that the J-Link DLL will perform a read-modify-write of flash memory regions <= 64 kB. Make sure you adjust this value depending on the device and sector you are trying to modify. |
||
| + | |||
| + | [[:File:Wiki_J-LinkCommander_RMW_Example.zip]] |
||
To use the example project follow these steps: |
To use the example project follow these steps: |
||
| − | * Unzip the contents of the '' |
+ | * Unzip the contents of the ''Wiki_J-LinkCommander_RMW_Example.zip'' to a example folder |
* execute StartTest.bat |
* execute StartTest.bat |
||
* The J-Link commander will open and you should see the following output |
* The J-Link commander will open and you should see the following output |
||
Revision as of 11:58, 14 March 2017
Contents
This article describes how to use the Read-Modify-Write (RMW) function in the J-Link software. This article assumes that there is already a basic knowledge about flash programming in general.
The following example project will be shown for a Infineon XMC4500 MCU but can be applied to any other MCU. This can for example be used to split physical memory sectors into smaller logical ones.
By default the Read-Modify-Write threshold is set to 1 kB in order to allow read-modify-write of single bytes in flash (e.g. when editing bytes in memory windows of IDEs).
To increase the threshold J-Link offers the following command string: SetFlashDLNoRMWThreshold = <value>
A more detailed description is available in the J-Link User Manual (UM08001).
Sample project
The sample project is designed to be used with J-Link and a Infineon XMC4500 MCU. It will we automatically executed when starting the .bat file.
The .bat and .jlink file can be used as a reference for your own RMW flash projects.
How to
For the example project the SetFlashDLNoRMWThreshold value is set to 0xFFFF (64 kB RMW threshold). This means that the J-Link DLL will perform a read-modify-write of flash memory regions <= 64 kB. Make sure you adjust this value depending on the device and sector you are trying to modify.
File:Wiki_J-LinkCommander_RMW_Example.zip
To use the example project follow these steps:
- Unzip the contents of the Wiki_J-LinkCommander_RMW_Example.zip to a example folder
- execute StartTest.bat
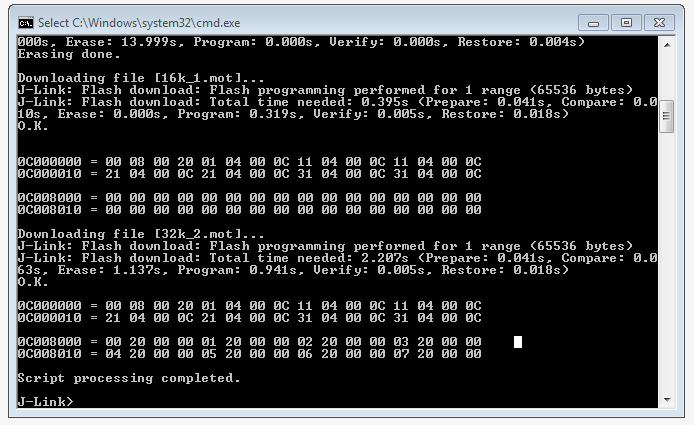
- The J-Link commander will open and you should see the following output
- If your output matches the screenshot, the RMW was successful (this applies only to the example project, the output on your own project might vary)
