Difference between revisions of "ST STM32H573I-DK"
(Created page with "__TOC__ This article describes specifics for the ST STM32H573I-DK evaluation board. 450px == Minimum requirements == * J-Link softw...") |
|||
| Line 1: | Line 1: | ||
__TOC__ |
__TOC__ |
||
| − | This article describes specifics for the ST STM32H573I-DK evaluation board. |
+ | This article describes specifics for the '''ST STM32H573I-DK''' evaluation board.<br> |
| + | [[File:ST_STM32H573I-DK.jpg|450px]] |
||
| − | [[File:ST_STM32H573I_DK_evalboard.jpg|450px]] |
||
| − | == Minimum requirements == |
||
| − | * J-Link software V7.86c or later |
||
== Preparing for J-Link == |
== Preparing for J-Link == |
||
| + | *On the back side of the board close jumper J1 so that the board can be accessed with an external debug connector. |
||
| − | The STM32H573I-DK comes with a ST-Link on board debugger. To start using an external J-Link with the evalboard, the following jumpers need to be modified: |
||
| + | *Connect the J-Link to the 10 pin debug connector CN12 which is located on the backside of the board. |
||
| − | *JP1 1-2 closed: External debugger selection |
||
| + | [[File:ST_STM32H573I-DK_JP1.jpg|450px]] |
||
| − | *JP4 3-4 closed: USB-PD 5V via CN17 |
||
| + | *On the display side of the board set jumper JP4 to 3-4 (USB-PD) for power via USB-C (CN17). |
||
| − | Afterwards, the board can be powered via CN17 (front side). The J-Link must be attached to the 10-pin debug connector CN12 (back side). |
||
| + | *Power the board via USB-C (CN17). |
||
| + | [[File:ST_STM32H573I-DK_JP4.jpg|450px]] |
||
| + | <br>The result should look like this:<br> |
||
| + | [[File:ST_STM32H573I-DK_Cabled.jpg|450px]] |
||
| + | * Verify the Connection with e.g. [https://wiki.segger.com/J-Link_cannot_connect_to_the_CPU#Verify_functionality_using_J-Link_Commander J-Link Commander]. The output should look as follows: |
||
| − | [[File:ST_STM32H573I_DK_evalboard_connected.jpg|450px]] |
||
| + | [[File:ST_STM32H573I-DK_Connect.PNG|400px]] |
||
| − | |||
| − | Verify the Connection with e.g. [https://wiki.segger.com/J-Link_cannot_connect_to_the_CPU#Verify_functionality_using_J-Link_Commander J-Link Commander]. The output should look as follows: |
||
| − | |||
| − | [[File:ST_STM32H573I_DK_evalboard_Connect.PNG|400px]] |
||
== Example Project== |
== Example Project== |
||
| − | The following example project was created with the SEGGER Embedded Studio project wizard and runs out-of-the-box on the |
+ | The following example project was created with the SEGGER Embedded Studio project wizard and runs out-of-the-box on the [SiliconVendor] [EvalBoardName].<br>It is a simple Hello World sample linked into the internal flash.<br> |
| + | ====Setup==== |
||
| − | |||
| + | *J-Link software: V7.84b |
||
| − | '''SETUP''' |
||
| + | *Embedded Studio: V6.30 |
||
| − | *J-Link software: V7.86c |
||
| + | *Hardware: ST STM32H573I-DK |
||
| − | *Embedded Studio: V7.10 |
||
| + | *Link: [[File:ST_STM32H573I-DK_HelloWorld.zip]] |
||
| − | *Hardware: ST STM32H573I-DK evaluation board |
||
| − | *Link: [[File:ST_STM32H573I_DK_TestProject_ES_V710.zip]] |
||
Revision as of 14:47, 8 March 2023
This article describes specifics for the ST STM32H573I-DK evaluation board.
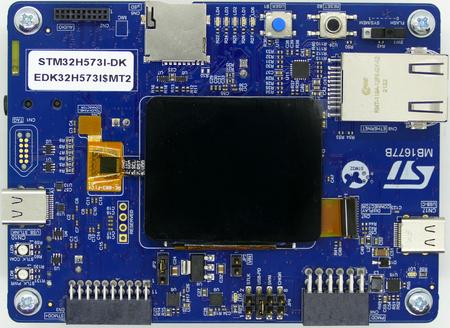
Preparing for J-Link
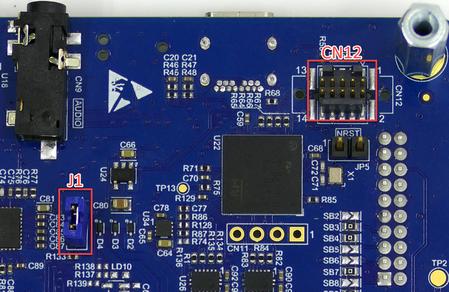
- On the back side of the board close jumper J1 so that the board can be accessed with an external debug connector.
- Connect the J-Link to the 10 pin debug connector CN12 which is located on the backside of the board.
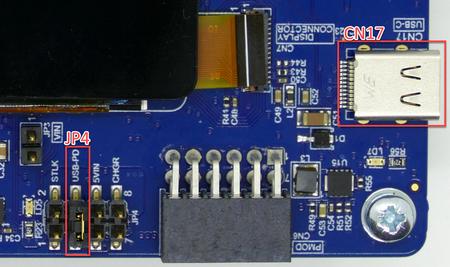
- On the display side of the board set jumper JP4 to 3-4 (USB-PD) for power via USB-C (CN17).
- Power the board via USB-C (CN17).
The result should look like this:
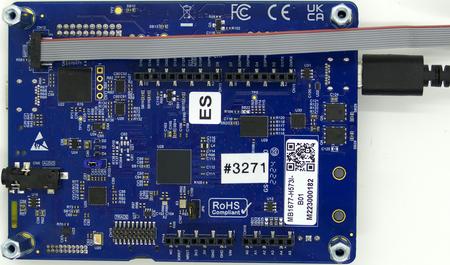
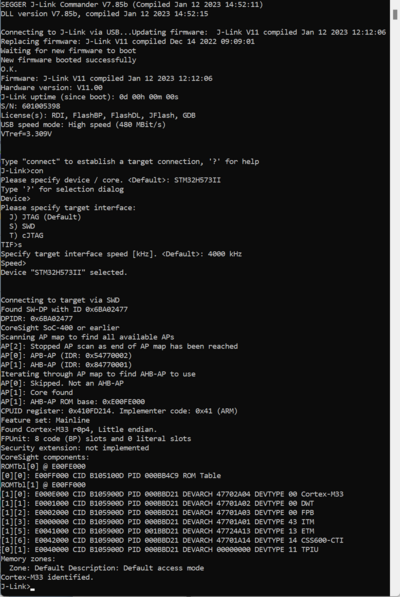
- Verify the Connection with e.g. J-Link Commander. The output should look as follows:
Example Project
The following example project was created with the SEGGER Embedded Studio project wizard and runs out-of-the-box on the [SiliconVendor] [EvalBoardName].
It is a simple Hello World sample linked into the internal flash.
Setup
- J-Link software: V7.84b
- Embedded Studio: V6.30
- Hardware: ST STM32H573I-DK
- Link: File:ST STM32H573I-DK HelloWorld.zip
