Difference between revisions of "TI Code Composer Studio"
(→Using Ethernet in TI's Code Composer Studio (CCS)) |
(→Using Ethernet in TI's Code Composer Studio (CCS)) |
||
| Line 74: | Line 74: | ||
=Using Ethernet in TI's Code Composer Studio (CCS)= |
=Using Ethernet in TI's Code Composer Studio (CCS)= |
||
| − | ==Problem== |
+ | ===Problem=== |
In current versions of the TI Code Composer Studio (CCS), the host interface to the J-Link (USB / Ethernet) can not be specified in the project settings. |
In current versions of the TI Code Composer Studio (CCS), the host interface to the J-Link (USB / Ethernet) can not be specified in the project settings. |
||
| − | ==Work-around== |
+ | ===Work-around=== |
Make sure that no J-Link is connected to the PC via USB. Now, when starting a debug session, the J-Link DLL noticed that no J-Link is connected and the ''Emulator selection'' dialog pops up, which allows to connect to a J-Link via Ethernet (TCP/IP):<br> |
Make sure that no J-Link is connected to the PC via USB. Now, when starting a debug session, the J-Link DLL noticed that no J-Link is connected and the ''Emulator selection'' dialog pops up, which allows to connect to a J-Link via Ethernet (TCP/IP):<br> |
||
[[File:CCS_EmulatorSelectionDialog.png]]<br> |
[[File:CCS_EmulatorSelectionDialog.png]]<br> |
||
Now, enter the desired connection method and confirm the dialog with ''Yes''. If nothing specified, the J-Link DLL shows a list of all J-Links found via TCP/IP. Afterwards, CCS establishes a connection via TCP/IP to the selected J-Link. |
Now, enter the desired connection method and confirm the dialog with ''Yes''. If nothing specified, the J-Link DLL shows a list of all J-Links found via TCP/IP. Afterwards, CCS establishes a connection via TCP/IP to the selected J-Link. |
||
| − | ==Notes== |
+ | ===Notes=== |
*The work-around can be used with any J-Link with Ethernet interface. |
*The work-around can be used with any J-Link with Ethernet interface. |
||
*Currently, the work-around is available for Windows, only. |
*Currently, the work-around is available for Windows, only. |
||
Revision as of 11:12, 18 October 2017
Contents
Minimum CSS Version Requirements
In order to use J-Link with TI CCS, min. V6.1.3 of TI CCS is required. Earlier versions might work but are not guaranteed to do so. Please understand that SEGGER does not provide any support for CCS versions earlier than V6.1.3.
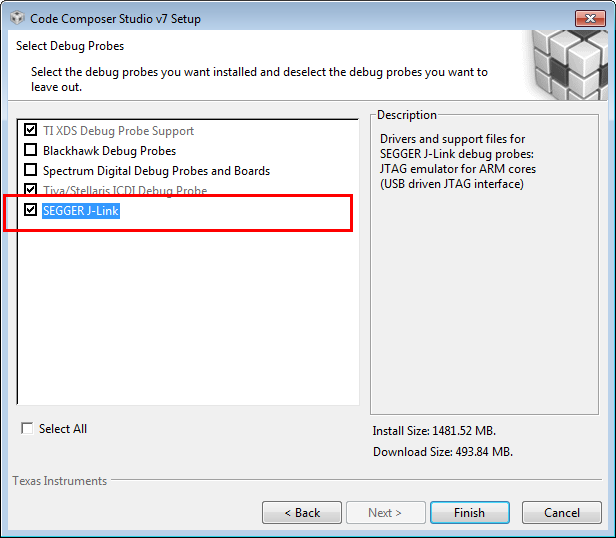
Adding J-Link support at installation time
Since TI CCS v7, J-Link is supported out-of-the-box if J-Link support is selected to be added at installation time of CCS.
For more information regarding older versions of CCS: Adding J-Link support to older CCS versions.
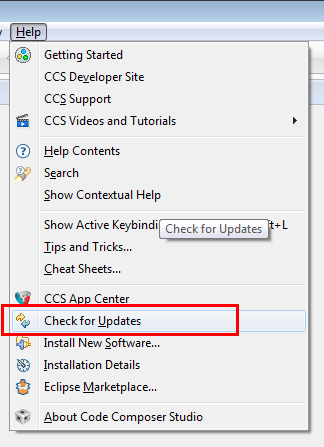
Updating J-Link inside CCS
The J-Link plugin can be automatically updated as any other Eclipse plugin. A manual update can be triggered via Help -> Check for Updates.
Using TI CCS with J-Link
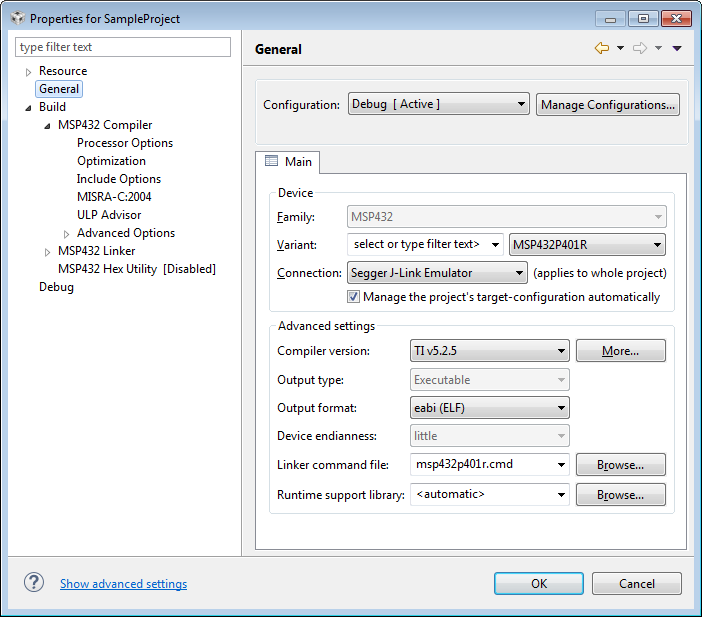
In the following, a short step-by-step tutorial how to configure a Code Composer Studio project to be used with J-Link, is given.
- Open the project to configure
- Open project properties by clicking Project | Properties from the main menu and go to the General tab
- Make sure that the proper device is selected
- Make sure that Segger J-Link Emulator is selected as connection type
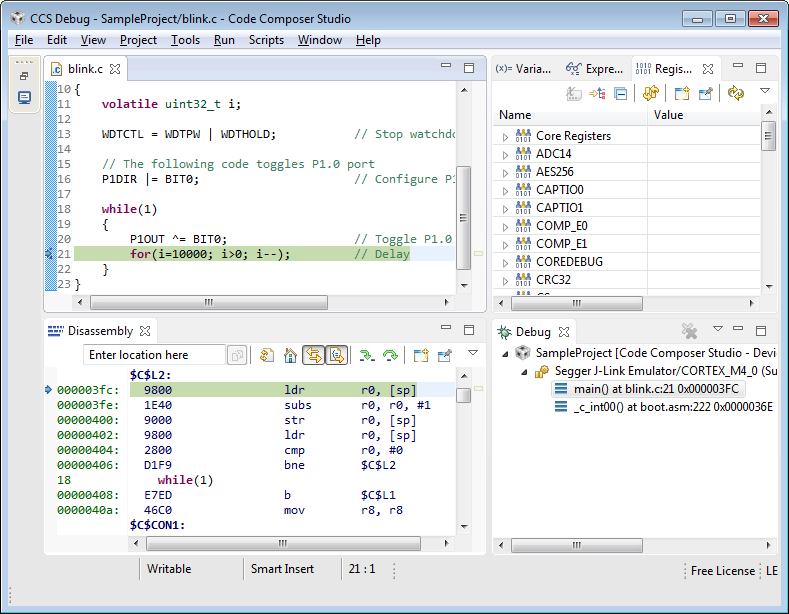
Ready for debugging
- Now the project is ready to be debugged with J-Link / J-Trace.
Adding J-Link support to older CCS versions
In order to get started with J-Link and CCS, please make sure that latest SEGGER software and documentation pack is installed, which can be downloaded here.
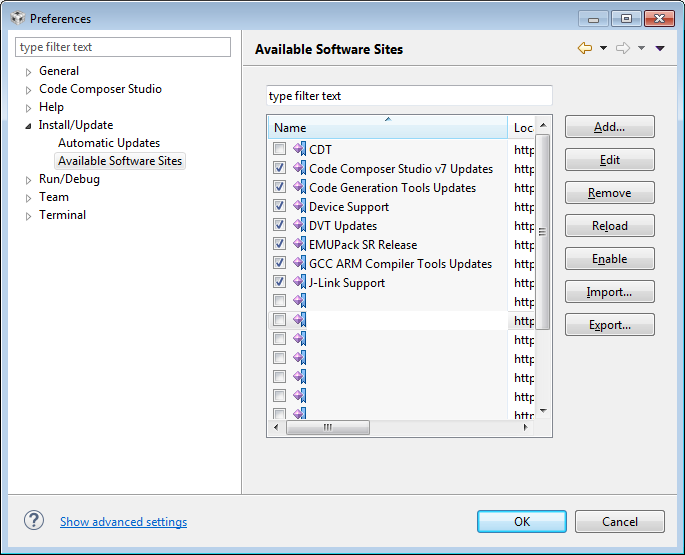
Adding J-Link to Available Software Sites
- Open CCS
- Open Window | Preferences
- In Install/Update select Available Software Sites
- Press Add...
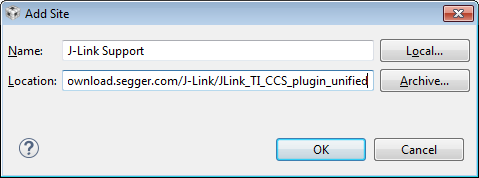
- Enter "J-Link Support" as Name
- Add the following URL as Location:
https://download.segger.com/J-Link/JLink_TI_CCS_plugin_unified
Note: The link is not browsable. Please do not try to download the plugin via your browser from the link above. The plugin is downloadable and installable via the TI CCS update interface only.
- Press OK
Installing J-Link
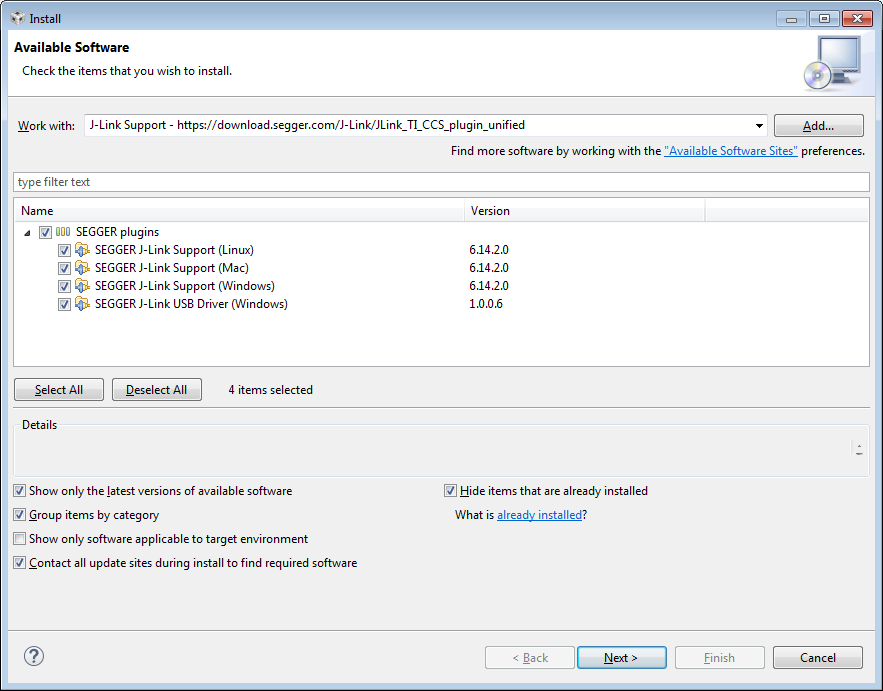
- Open Help | Install New Software
- In Work With: field: Choose "J-Link Support" from the drop down list
- Check J-Link support
- Click Next
- Click Next
- Click Next
- Accept the license
- Click Finish
- Restart TI CCS
Using J-Link in a project
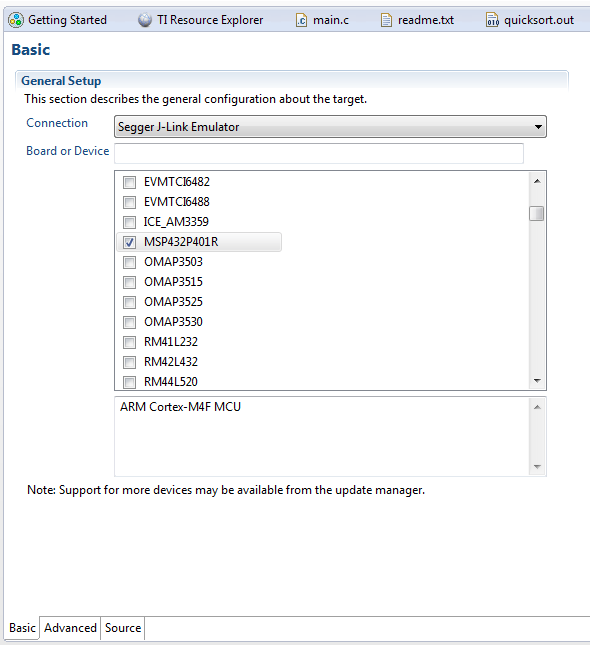
- Open the target configuration (.ccxml file in the project)
- View | Target Configuration can be used to find the target configuration file if necessary
- In the Connection field choose "SEGGER J-Link Emulator" from the drop down list
- Check the correct target in the list below
- In the Advanced tab, additional settings are configurable , e.g. the JTAG speed
- The project is now ready to be debugged with J-Link
Using Ethernet in TI's Code Composer Studio (CCS)
Problem
In current versions of the TI Code Composer Studio (CCS), the host interface to the J-Link (USB / Ethernet) can not be specified in the project settings.
Work-around
Make sure that no J-Link is connected to the PC via USB. Now, when starting a debug session, the J-Link DLL noticed that no J-Link is connected and the Emulator selection dialog pops up, which allows to connect to a J-Link via Ethernet (TCP/IP):

Now, enter the desired connection method and confirm the dialog with Yes. If nothing specified, the J-Link DLL shows a list of all J-Links found via TCP/IP. Afterwards, CCS establishes a connection via TCP/IP to the selected J-Link.
Notes
- The work-around can be used with any J-Link with Ethernet interface.
- Currently, the work-around is available for Windows, only.
- Emulator selection dialog for MAC / Linux is already planned for future versions.
- Native host interface selection, using the GUI in CCS, is also planned for future versions.