Flasher/FAQ/reduce write sector size
How to write sectors with 32 Bytes for AURIX
The AURIX flash algorithm supports two operation modes. The standard procedure used writes the data in blocks of a size that represents a good compromise between performance and sector "waste". The other mode uses sector sizes that correspond exactly to the size of the ECC pages, but is slower by a factor of 6..10.
For this reason, we recommend splitting the data file so that the vast majority of the data can be processed with the fast standard mode, and only the area that requires precise writing of the ECC pages is programmed with the slow mode. Most of the time, it is sufficient to write only an area in slow mode whose size corresponds to the sector size of the standard mode.
These areas are combined in a project and programmed one after the other as a "batch".
For each AURIX device type (and interface) with standard sectors, there is an equivalent device definition with small sectors (Postfix: ECCPageSectors). All this devices are available in the device selection dialog.
The fast algorithm uses a RAM code by default. The slow algorithm cannot use a RAMCode for technical reasons. This option is therefore deactivated when this device definition is used.
Preparation
To split the data areas, you can use any (Hex-)Editor or tools like J-Flash or e.g. srec_cat. Save those areas in files with different file names. These names must fit into the 31 characters of the file name. If the file names are longer, they are truncated after the 31st character. The "safest" way is therefore to directly use file names with a maximum of 31 ASCII characters.
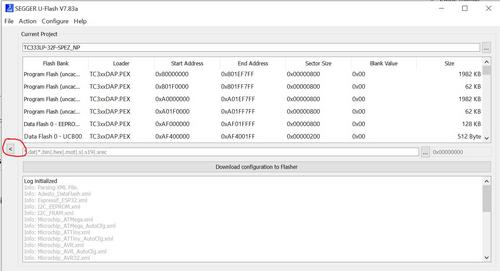
To automate the programming of the two files, we use the BATCH composer of the U-Flash. This is invoked by clicking on the "<" sign.
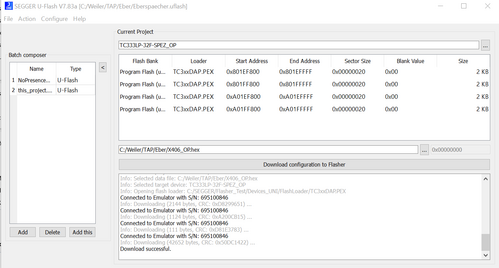
In BatchComposer, projects can be called up that have been previously defined and saved.
A previously defined project is added with "Add", the "current project" is added with "Add this".
With "Download configuration to Flasher" both projects are transferred to the Flasher. With a trigger - e.g. the PROG button or #AUTO both files are flashed one after the other.
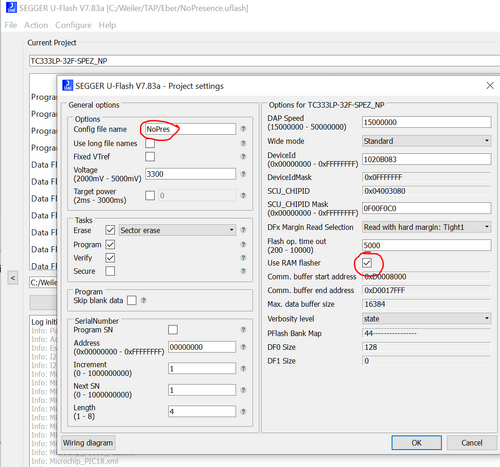
When creating the first project, it is important to use a unique "Config file name"! Here in the example NoPres. For the large image, we use the RAM code to make it fast.
After preparation of the project for the large image data, save the project and add it to the batch.
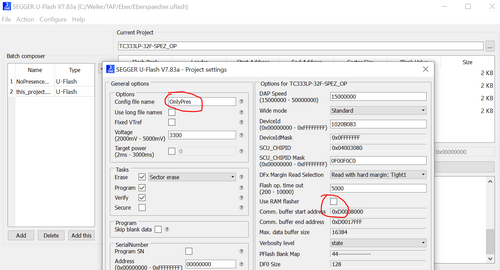
Now the project for the small data pattern is prepared. A different "config file name" must be used for this, here as example OnlyPres. The RAM flasher is switched off here and cannot be activated. This project is now also saved and added to the batch.
If the application software changes during the product life cycle, the separate DAT files must be recreated and replaced on the flasher.


