Flasher/Renesas DLM
This article explains how to set up a project for Renesas RA Device Lifecycle Management (DLM) programming.
Please note that the actual layout of the dialog elements may depend on the device family. In this case, the screenshots are only consistent for the device family shown. However, they should be suitable for explaining the general operation. The procedure described generally applies to all RA families.
Contents
Projects
It is necessary to create multiple projects for Renesas RA Device Lifecycle Management (DLM) programming.
So that the projects do not have to be executed individually, they can be combined and automatically executed one after the other with the help of the Batch Composer.
Inititialization project
This project is used to initialize the device.
- Open U-Flash and select the required RA device.
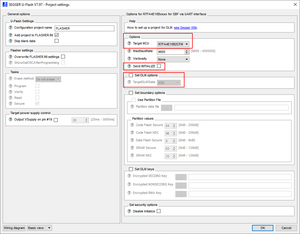
- Select Configure->Project Settings(Alt+F7) from the menu
- Select your exact device
- Select Send INITIALIZE
- Select Set DLM Option and set TargetDLMState to SSD
- Click OK
- Select File->Save project as... from the menu and save the project
You do not need to select a data file for this project.
If no data file is selected, a dummy file will be created on the Flasher to satisfy generic requirements.
If you select a data file, it will be downloaded to the Flasher, but it will not be used for programming.
Programming project
This project is used to progam the flash memory.
- Open J-Flash and select your device
- Configure the J-Flash project to your liking
- Open your data file in J-Flash
- Save the J-Flash project
Key injection, TrustZone boundary setting
This project is used to inject DLM- and user keys (if required) and to set the boundary settings.
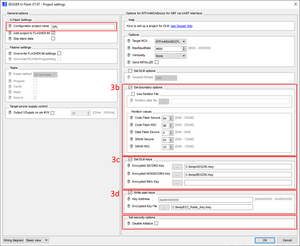
- Select Configure->Project Settings(Alt+F7) from the menu
- TrustZone boundaries setting. These can be set manually or by importing a .rpd file output from e2 studio build phase or other toolchains.
- DLM key injection. Select pre-generated key files for required fields.
- User key injection. Select the pre-generated user key and the target address. If more individual user keys are required than the configuration program supports for a single project, divide them into individual Universal Flasher sub-projects.
- Set a unique name in Config File Name
All paths to keys are saved as absolute paths in the project to ensure the correct files are used from a source repository etc.
- It is also possible to Disable Initialize in the dialog
Care should be taken when disabling Initialize as the tooling will not be able to return the device back to factory defaults.
- Select File->Save project as... from the menu and save the project
It is important not to leave the Config File Name as default as this will conflict with other Universal Flasher projects in the Batch composer and cause production sequence to fail
Set final DLM state
This project is used to set the final DLM state.
- Select Configure->Project Settings(Alt+F7) from the menu
- Set the final required DLM state
- Set a unique name in Config File Name
- Select File->Save project as... from the menu and save the project
Add the projects to the batch composer
The projects need to be added to the batch composer
- Create a new project or open a new U-Flash instance
- Click the Add existing project button and select the init project you created before
- Click the Add existing project button and select the programming (.jflash) project you created before
- Click the Add existing project button and select the Key injection, TrustZone boundary setting project(s)
- Click the Add existing project button and select the Set final DLM state project
This batch project can now be sent to the Flasher and/or saved for later use.
For further information about RA Device Lifecycle Management, keys & TrustZone boundary options please contact Renesas directly.

