J-Link XVCD Server
The J-Link Xilinx Virtual Cable Daemon Server is part of the J-Link software package (starting with V7.92d). It extends J-Link's compatibility to use it with Xilinx Vivado software tools.
Contents
How to connect to Vivado
Before starting J-Link XVCD Server make sure a J-Link is connected to the computer and the target device is powered and connected to the J-Link.
Calling under Windows
To start J-Link XVCD Server on Windows, open the 'Run' prompt (Windows-R) or a command terminal (cmd) and enter
<PathToJLinkSoftware>\JLinkXVCDServer.exe <CommandLineOptions>
Calling under Linux / Mac
To start J-Link XVCD Server on Linux / Mac, open a terminal and call
JLinkXVCDServer <CommandLineOptions>
Console interface
If no command line options are passed, the XVCD Server will connect to the available J-Link. In case there are multiple J-Links connected to the PC, a selection dialog will pop up. Selecting a J-Link can optionally be passed via command line options. There will be no J-Link selection dialog in case the J-Link has been selected via command-line options.
After successfull connection with the J-Link, the console will print general information about the J-Link and the server status:
Firmware: J-Link V12 compiled Aug  2 2023 10:34:27
Hardware version: V12.00
J-Link uptime (since boot): 0d 00h 00m 13s
S/N:
License(s): RDI, FlashBP, FlashDL, JFlash, GDB
USB speed mode: High speed (480 MBit/s)
VTref=1.816V
Target interface: JTAG
Max client connections: 1
Listening on TCP/IP port 2542
Waiting for XVC connection...
The default port for the J-Link XVCD Server to listen for XVC clients is 2542. Optional configuration of the port can be passed via command line options.
Establish connection with Vivado
To establish a connection between the J-Link XVCD Server the following steps are necessary:
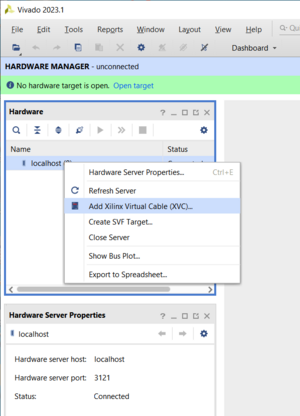
- Start Vivado and open the Hardware Manger
- Click "Auto Connect" to create a hardware server on localhost
- Add a Xilinx Virtual Cable (XVC)
- Specify the host name (in this example the J-Link XVCD Server is running on localhost)
- Set the Port
Subsequently, Vivado will establish the connection which can be verified by the output of the J-Link XVCD Server:
Target interface speed: 10000kHz
New XVC connection (127.0.0.1:54506)
The target interface speed is negotioated by Vivado and the connected J-Link by complying to the capabilities of the J-Link.
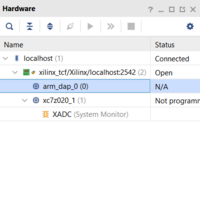
Next to the output of the J-Link XVCD Server, Vivado will present the hardware device properties within Vivado:

Older versions of Vivado do not execute a correct disconnect sequence when closing their server connection.
After disconnecting Vivado from the XVCD server, the target device must be power-cycled to allow a subsequent connect with J-Link software.
Bare sessions with Vivado and the XVCD server are not affected by this.
Command line options
Following additional command line options are available. These options are temporary for each start of the XVCD Server.
| Command line option | Explanation |
|---|---|
| -Port <PortNo> | Select the port to listen for XVC clients. |
| -USB <SerialNo/Nickname> | Selects a specific J-Link (via its serial number or nickname) to connect to. Used in case multiple J-Links are connected to the same PC via USB. |
| -IP <IP/Tunnel/Nickname> | Selects a specific J-Link (via IP/Tunnel/Nickname) to connect to via TCP/IP. |
