Difference between revisions of "Enable J-Link log file"
(→Enable J-Link Log File) |
|||
| (9 intermediate revisions by 6 users not shown) | |||
| Line 1: | Line 1: | ||
== Enable J-Link Log File == |
== Enable J-Link Log File == |
||
| − | Software which uses the J-Link DLL to include J-Link support (e.g. IDEs) |
+ | Software which uses the J-Link DLL to include J-Link support (e.g. IDEs) can implement an option to specify a J-Link log file. As this is no must, the J-Link log file can also be set / overwritten using the J-Link Web Control Panel. This allows to create a log file independently of the used software. |
| + | === The generic way === |
||
| − | Following steps needs to be done to configure the J-Link log file using the J-Link Control Panel: |
||
| + | |||
| − | #Open the J-Link Commander |
||
| + | The following steps are required to configure the J-Link log file using the [[J-Link web control panel]]: |
||
| − | #Click the small green J-Link icon in the windows task bar |
||
| + | #Open the J-Link Commander. It should connect to a J-Link automatically, if one is present. |
||
| − | #Switch to the ''Settings'' tab in the J-Link Control Panel |
||
| + | #Navigate to ''localhost:19080'' using a web browser (On windows, one can also simply click the small green J-Link icon in the windows task bar) |
||
| − | #Check the ''Override'' checkbox in the ''Log file'' section and specify a path to the log file |
||
| + | #Switch to the ''Settings'' tab in the J-Link Web Control Panel |
||
| + | #Check the ''Override'' checkbox in the ''Log file'' section. |
||
#Close the J-Link Commander |
#Close the J-Link Commander |
||
| − | #From now |
+ | #From now on any J-Link DLL based application uses the J-Link log file override |
The override option can be used in any application to create the J-Link log file as it is a global override. |
The override option can be used in any application to create the J-Link log file as it is a global override. |
||
| + | |||
| + | '''Note:''' The generic way also overrides the specific configuration options below. |
||
=== J-Link Commander === |
=== J-Link Commander === |
||
| − | The J-Link |
+ | The J-Link logfile can be enabled by passing the ''-Log <Path>'' command via command line option to the J-Link Commander. |
=== J-Link GDB Server === |
=== J-Link GDB Server === |
||
| Line 31: | Line 35: | ||
[[File:ES_EnableLog_File.PNG]] |
[[File:ES_EnableLog_File.PNG]] |
||
| + | |||
| + | === SystemView === |
||
| + | In SystemView the J-Link log file can be set in the recorder configuration. |
||
| + | ''Tool'' -> ''Recorder Configuration'', select ''J-Link'', check ''Use Advanced Settings'', select the log file to be written. |
||
=== IAR EWARM === |
=== IAR EWARM === |
||
Open the project options ''Project'' --> ''Options'' and switch to the ''J-Link / J-Trace'' --> ''Connection'' tab. Check the ''Log communication'' checkbox and enter a path as in the screenshot below. |
Open the project options ''Project'' --> ''Options'' and switch to the ''J-Link / J-Trace'' --> ''Connection'' tab. Check the ''Log communication'' checkbox and enter a path as in the screenshot below. |
||
[[File:EnableJLinkLog_IAR_EWARM.png]] |
[[File:EnableJLinkLog_IAR_EWARM.png]] |
||
| + | |||
| + | === J-Link SDK / DLL === |
||
| + | The J-Link log file can be enabled through a separate J-Link DLL API function. For further information regarding this, please refer to the J-Link SDK user manual. Please note that this manual is available for users with a valid J-Link SDK license, only. |
||
Latest revision as of 14:36, 8 February 2024
Contents
Enable J-Link Log File
Software which uses the J-Link DLL to include J-Link support (e.g. IDEs) can implement an option to specify a J-Link log file. As this is no must, the J-Link log file can also be set / overwritten using the J-Link Web Control Panel. This allows to create a log file independently of the used software.
The generic way
The following steps are required to configure the J-Link log file using the J-Link web control panel:
- Open the J-Link Commander. It should connect to a J-Link automatically, if one is present.
- Navigate to localhost:19080 using a web browser (On windows, one can also simply click the small green J-Link icon in the windows task bar)
- Switch to the Settings tab in the J-Link Web Control Panel
- Check the Override checkbox in the Log file section.
- Close the J-Link Commander
- From now on any J-Link DLL based application uses the J-Link log file override
The override option can be used in any application to create the J-Link log file as it is a global override.
Note: The generic way also overrides the specific configuration options below.
J-Link Commander
The J-Link logfile can be enabled by passing the -Log <Path> command via command line option to the J-Link Commander.
J-Link GDB Server
The J-Link logfile can be enabled by passing the -log <Path> command via command line option to the J-Link GDB Server.
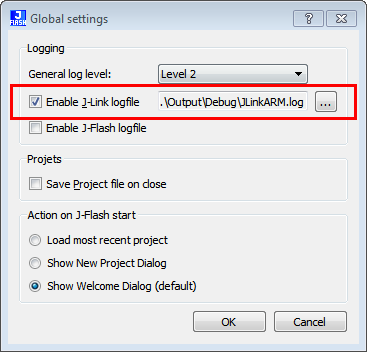
J-Flash
J-Flash --> Options --> Global settings... --> Enable J-Link logfile
Ozone
The J-Link log file can be enabled using the User Actions function int Project.SetJLinkLogFile(const char* FileName);. We recommend to add this function call in the OnProjectLoad() project function. For further information regarding this, please refer to the Ozone User Manual (UM08025).
Embedded Studio
In Embedded Studio the J-Link log file can be simply set through the project settings under: Project->Edit Options...->Debug->J-Link->Log File

SystemView
In SystemView the J-Link log file can be set in the recorder configuration. Tool -> Recorder Configuration, select J-Link, check Use Advanced Settings, select the log file to be written.
IAR EWARM
Open the project options Project --> Options and switch to the J-Link / J-Trace --> Connection tab. Check the Log communication checkbox and enter a path as in the screenshot below.

J-Link SDK / DLL
The J-Link log file can be enabled through a separate J-Link DLL API function. For further information regarding this, please refer to the J-Link SDK user manual. Please note that this manual is available for users with a valid J-Link SDK license, only.