Difference between revisions of "Atollic TrueSTUDIO"
| (One intermediate revision by one other user not shown) | |||
| Line 1: | Line 1: | ||
| + | |||
| + | |||
| + | '''Atollic TrueSTUDIO''' is a commercial IDE based on Eclipse that comes with J-Link and J-Trace support. |
||
| + | In order to use J-Link with Atollic TrueSTUDIO, it is usually not necessary to separately install the J-Link software and documentation package since TrueSTUDIO already comes with a J-Link GDB Server that is automatically started when starting the debug session. In the following, a short explanation on how to create a simple project for an eval board with TrueSTUDIO is given: |
||
| + | |||
__TOC__ |
__TOC__ |
||
| + | = Creating a simple Project= |
||
| − | Eclipse is a universal customizable IDE, which is also the base for many common commercial IDEs. |
||
| + | == Used components == |
||
| − | In order to work with Eclipse and debug with J-Link, you also need to install a toolchain which includes compiler, assembler, linker + GDB (GNU Debugger) for debugging (e.g. [https://launchpad.net/gcc-arm-embedded/ GNU Tools for ARM]). |
||
| + | {| class="wikitable" |
||
| − | Moreover, in order to allow hardware debugging on embedded systems via GDB + GDB Server, there is also an Eclipse plugin needed, which enables hardware debugging via GDB (e.g. the CDT plugin). |
||
| + | |- |
||
| − | After setting up Eclipse + Plugin, Eclipse will use GDB as debugger where GDB communicates via the GDB protocol with J-Link GDB Server, allowing to debug the target hardware which is connected to a J-Link. |
||
| + | ! IDE !! Emulator !! J-Link SW Version !! Evalboard |
||
| + | |- |
||
| + | | TrueSTUDIO for ARM V2.3.0 || J-LInk || V4.40c || STM32F103ZE-EVAL (STM32F103ZE) |
||
| + | |} |
||
| + | == Setup Instructions == |
||
| + | * Start TrueSTUDIO and click '''File | New | C Project ...''' from the main menu |
||
| + | * Enter a project name |
||
| + | *Select '''Embedded C Project''' |
||
| + | *Click '''Next''' |
||
| + | |||
| + | |||
| + | [[File: TrueSTUDIO_Tutorial_1.png]] |
||
| + | |||
| + | * Select the eval board the project shall be created for and what configuration (debugging in Flash or RAM) is desired |
||
| + | * Click '''Next''' |
||
| + | |||
| + | [[File: TrueSTUDIO_Tutorial_2.png]] |
||
| + | |||
| + | * Select J-Link from the list of supported emulators |
||
| + | * Click '''Next''' |
||
| + | |||
| + | [[File: TrueSTUDIO_Tutorial_3.png]] |
||
| + | |||
| + | * Select which configurations shall be created (Debug configuration / Release configuration) |
||
| + | * Click '''Finish''' to create the project |
||
| + | |||
| + | [[File: TrueSTUDIO_Tutorial_4.png]] |
||
| + | |||
| + | * Click the '''Build''' button from the toolbar |
||
| + | * In order to start a debug session, click '''Debug'''. A debug configuration with default settings, based on the information given when creating the project, will be automatically created by TrueSTUDIO (if it is necessary to configure custom settings click '''Run | Debug Configurations...''' from the main menu). |
||
| + | |||
| + | [[File: TrueSTUDIO_Tutorial_5.png]] |
||
| + | == Ready to Go == |
||
| − | = Using J-Link Command Strings = |
||
| − | In order to use J-Link Command Strings for a TrueSTUDIO project, the Debug Configurations needs to be edited. |
||
| − | * Open '''Run''' -> '''Debug Configurations'''. |
||
| − | * Select '''Startup Scripts''' |
||
| − | * Select '''Target Hardware Initialization Script''' |
||
| − | * Enter monitor exec <CommandString> |
||
| − | * Hit '''Apply''' |
||
| − | [[File:TrueSTUDIO_CmdStrings.png]]<br> |
||
| + | You can start debugging and use J-Link with Atollic TrueSTUDIO for ARM. |
||
| + | [[File: TrueSTUDIO_Tutorial_6.png]] |
||
| − | Please refer to [[Eclipse#Specifying J-Link GDB Server commandline options | Specifying J-Link GDB Server commandline options]]<br> |
||
| − | Please note that J-Link Command Strings can also be executed from J-Link script files. |
||
Latest revision as of 13:42, 8 October 2020
Atollic TrueSTUDIO is a commercial IDE based on Eclipse that comes with J-Link and J-Trace support.
In order to use J-Link with Atollic TrueSTUDIO, it is usually not necessary to separately install the J-Link software and documentation package since TrueSTUDIO already comes with a J-Link GDB Server that is automatically started when starting the debug session. In the following, a short explanation on how to create a simple project for an eval board with TrueSTUDIO is given:
Creating a simple Project
Used components
| IDE | Emulator | J-Link SW Version | Evalboard |
|---|---|---|---|
| TrueSTUDIO for ARM V2.3.0 | J-LInk | V4.40c | STM32F103ZE-EVAL (STM32F103ZE) |
Setup Instructions
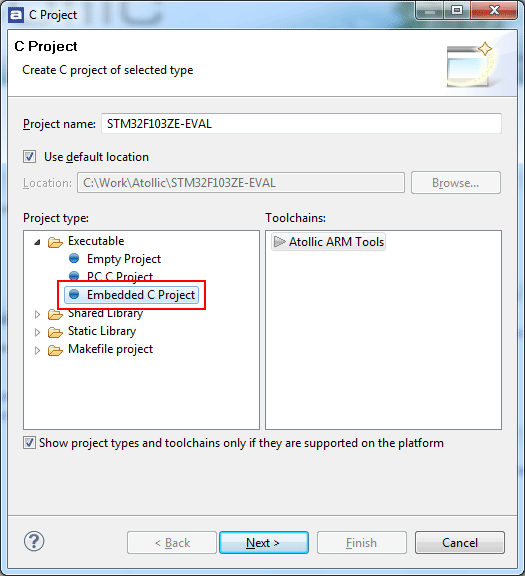
- Start TrueSTUDIO and click File | New | C Project ... from the main menu
- Enter a project name
- Select Embedded C Project
- Click Next
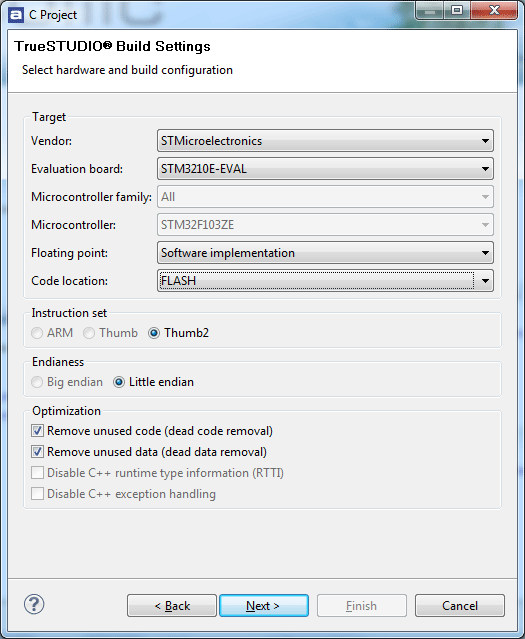
- Select the eval board the project shall be created for and what configuration (debugging in Flash or RAM) is desired
- Click Next
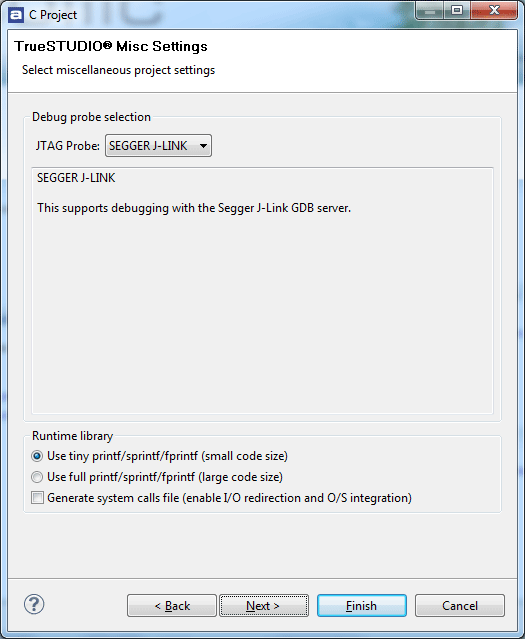
- Select J-Link from the list of supported emulators
- Click Next
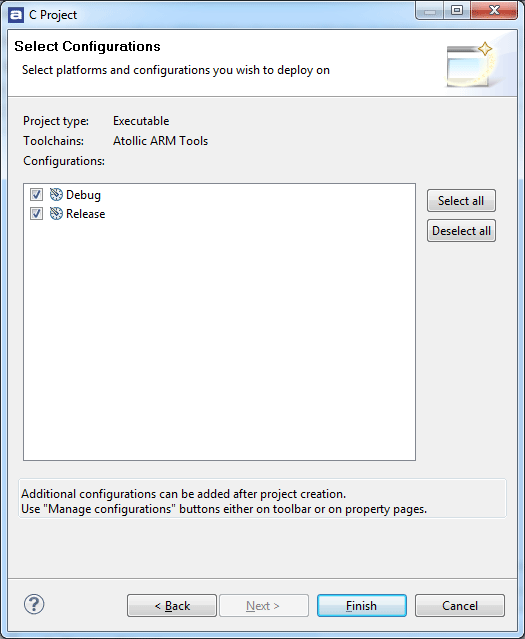
- Select which configurations shall be created (Debug configuration / Release configuration)
- Click Finish to create the project
- Click the Build button from the toolbar
- In order to start a debug session, click Debug. A debug configuration with default settings, based on the information given when creating the project, will be automatically created by TrueSTUDIO (if it is necessary to configure custom settings click Run | Debug Configurations... from the main menu).
Ready to Go
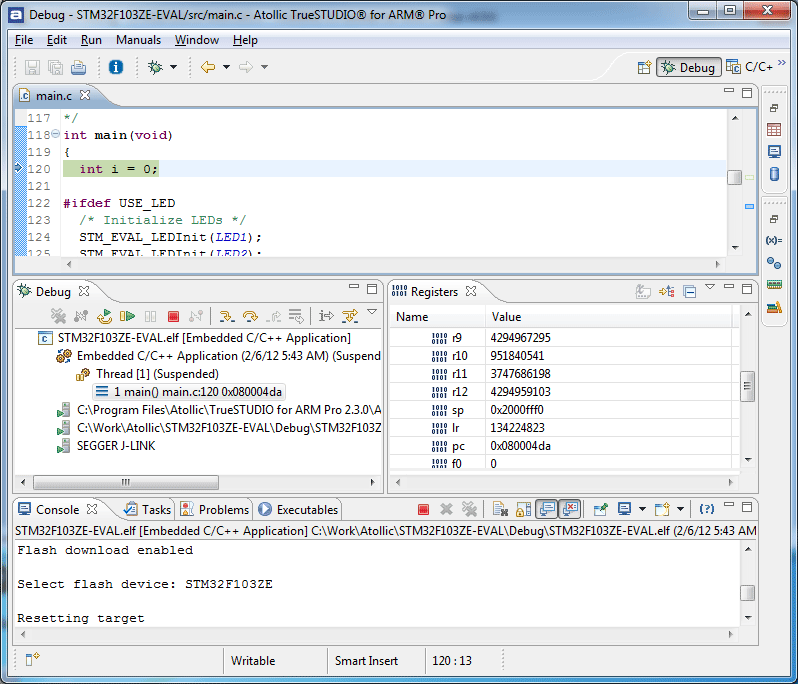
You can start debugging and use J-Link with Atollic TrueSTUDIO for ARM.
