Flasher/FAQ
This gives answers to the most Frequently Asked Questions.
FAQ: Frequently Asked Questions
How can I start operation on my Flasher?
The following options are available for controlling the Flasher:
- Starting a programming by button "PROG"
- Dedicated pins in SUB-D9: START (start programming), BUSY (busy indication), READY/ERROR (result if not(BUSY) ); see: Flasher User Guide (UM08022): Ch. 4.2 "Handshake control".
- Command line via TELNET or serial interface; see: Flasher User Guide (UM08022): Ch. 4.3 "ASCII command interface".
- By DLL: The J-Link SDK should be purchased for this purpose.
- FlasherControl.exe: An unofficial application, without any warranty and support. When running this tool it sends an #Auto command via USB. Details: FlasherControl wiki article
You can download the tool from this share folder: https://share.segger.com/index.php/s/6wkEFMRqNqS7eW5
I can not find my device in J-FLash / U-Flash, but the website states it is supported
For historical reasons, most processors with ARM, some PowerPC, RX and some more exotic core architectures are only supported by J-Flash (JFlash.exe).
Projects with other devices listed as "supported" must be created in U-Flash (UniversalFlasher.exe).
When programming my device, areas are programmed with some value although no data are available for them
This behavior is normally only noticed by the user on MCUs with some kind of flash integrity check such as ECC when attempting to program a block of data within or adjacent to an already programmed sector.
It is caused by the fact that the areas defined in the data files are always padded with the "empty value" to such an extent that a flash sector is completely filled. This is then programmed into the MCU in this way.
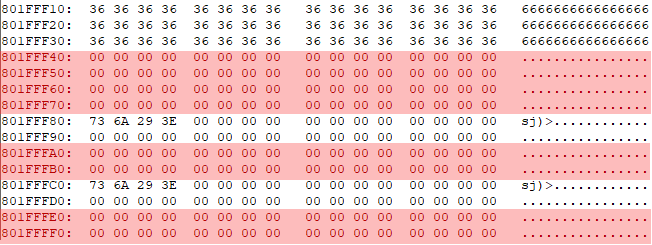
In the example the data file contains data for 0x801FFF10..0x801FFF2F, 0x0x801FFF80..0x801FFF83 and 0x801FFFC0..0x801FFFC3 (Picture 1). The sector size is for this example set to 0x800 i.e. 2KByte.
Due to padding all areas marked red are also written (Picture 2).
To prevent this, a suitable smaller sector size has to to be chosen, e.g. 0x20. The result with those changed settings are shown in the picture (Picture 3).
For MCUs with flash integrity check, the check value (ECC) is formed and written following the writing of a "page". Normally, this cannot be changed in subsequent reprogramming attempts. If the page is to be changed, the entire sector must be erased, as any attempt at reprogramming will result in an invalid integrity check value or an exception thrown by the MCU's flash controller.
The flasher currently does not distinguish between an "erase" sector size and a "write" page size. For devices supported by U-Flash, the sector can be adjusted in the device definition files. How to do this, is described in reduce write sector size. Please note that this is usually accompanied by a reduction in programming speed


