Difference between revisions of "Microchip MPLAB X"
SebastianB (talk | contribs) |
|||
| Line 3: | Line 3: | ||
In order to get started with J-Link and [http://www.microchip.com/mplab/mplab-x-ide MPLAB X] by Microchip install the latest SEGGER [https://www.segger.com/downloads/jlink/ software and documentation pack]. Please verify that your J-Link software is up to date. For detailed instructions on how to install and use MPLAB X, please refer to the MPLAB X [http://microchipdeveloper.com/mplabx:start wiki] and the getting started with J-Link [http://ww1.microchip.com/downloads/en/DeviceDoc/50002381A.pdf guide] by Microchip. |
In order to get started with J-Link and [http://www.microchip.com/mplab/mplab-x-ide MPLAB X] by Microchip install the latest SEGGER [https://www.segger.com/downloads/jlink/ software and documentation pack]. Please verify that your J-Link software is up to date. For detailed instructions on how to install and use MPLAB X, please refer to the MPLAB X [http://microchipdeveloper.com/mplabx:start wiki] and the getting started with J-Link [http://ww1.microchip.com/downloads/en/DeviceDoc/50002381A.pdf guide] by Microchip. |
||
| + | J-Link debug probes are supported in the MPLAB by default. It is only necessary to select the J-Link as Hardware Tool. |
||
| − | *Open '''Tools | Plugins''' |
||
| − | *Select the '''Available Plugins''' tab |
||
| − | *Press '''Reload Catalog''' |
||
| − | *Install the '''SEGGER JLink Probe''' plugin |
||
| − | *After restarting the IDE, the '''SEGGER JLink Probe''' plugin will shop up in the '''Installed''' tab, as shown below |
||
| + | *Open the '''Project Properties''' by selecting '''Properties''' in the context menu of your project, or by opening '''File | Project Properties'''. |
||
| − | [[File:Microchip_MPLAB_X_Tutorial_1.png]] |
||
| − | |||
| − | *Make sure the '''SEGGER JLink Probe''' plugin is marked as active |
||
| − | *Open the '''Project Properties''' by selecting '''Properties''' in the contexmenu of your project, or by opening '''File | Project Properties'''. |
||
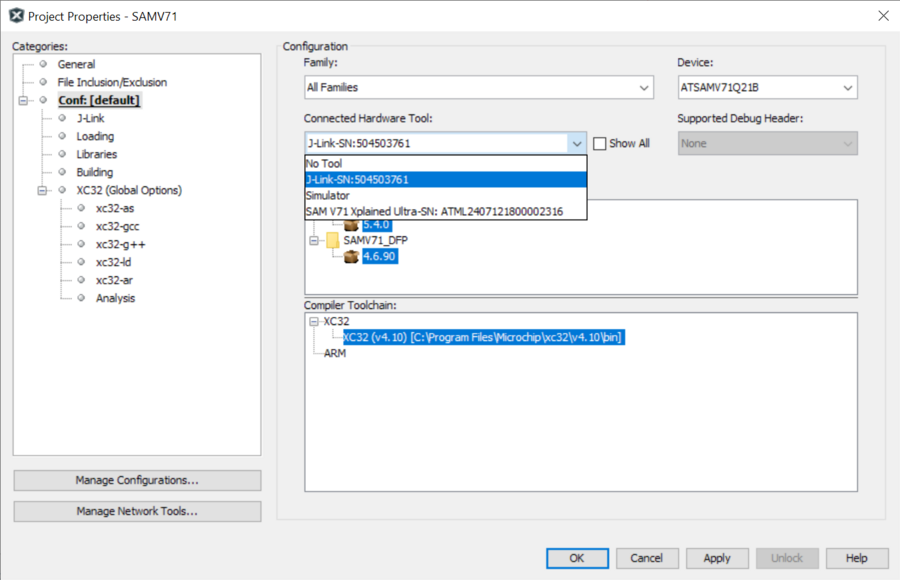
*In the '''Project Properties''', select SEGGER J-Link as used '''Hardware Tool''', and press '''Apply'''. |
*In the '''Project Properties''', select SEGGER J-Link as used '''Hardware Tool''', and press '''Apply'''. |
||
| − | [[File:Microchip_MPLAB_X_Tutorial_2.png]] |
+ | [[File:Microchip_MPLAB_X_Tutorial_2.png|900px]] |
*Now the project is ready to be debugged with J-Link. |
*Now the project is ready to be debugged with J-Link. |
||
| − | |||
| − | [[File:Microchip_MPLAB_X_Tutorial_3.png|800px]] |
||
Revision as of 11:35, 18 August 2022
Using a Microchip MPLAB X Project With J-Link
In order to get started with J-Link and MPLAB X by Microchip install the latest SEGGER software and documentation pack. Please verify that your J-Link software is up to date. For detailed instructions on how to install and use MPLAB X, please refer to the MPLAB X wiki and the getting started with J-Link guide by Microchip.
J-Link debug probes are supported in the MPLAB by default. It is only necessary to select the J-Link as Hardware Tool.
- Open the Project Properties by selecting Properties in the context menu of your project, or by opening File | Project Properties.
- In the Project Properties, select SEGGER J-Link as used Hardware Tool, and press Apply.
- Now the project is ready to be debugged with J-Link.
