Difference between revisions of "Raspberry Pi Pico"
(→Example Projects) |
|||
| (7 intermediate revisions by 3 users not shown) | |||
| Line 1: | Line 1: | ||
| − | [[File: RP_RP2040_Pico | thumb | right | 500 px | Raspberry Pi Pico evaluation board (RP2040)]] |
+ | [[File: RP_RP2040_Pico.JPG | thumb | right | 500 px | Raspberry Pi Pico evaluation board (RP2040)]] |
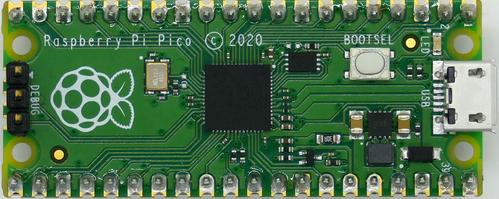
The Raspberry Pi Pico is a [[Raspberry Pi RP2040]] evaluation board. |
The Raspberry Pi Pico is a [[Raspberry Pi RP2040]] evaluation board. |
||
It is the first MCU evaluation board published by Raspberry Pi. |
It is the first MCU evaluation board published by Raspberry Pi. |
||
| Line 11: | Line 11: | ||
* external debug connector pads |
* external debug connector pads |
||
| − | For further information |
+ | For further information please refer to the [https://www.raspberrypi.org/documentation/pico/getting-started/ Rapberry Pi Pico web page] |
== Setting up with J-Link == |
== Setting up with J-Link == |
||
| + | [[File: RP_RP2040_Pico_Back.JPG | thumb | right | 300 px | Raspberry debug interface connection]] |
||
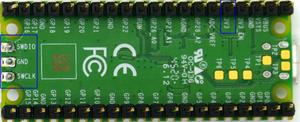
The Raspberry Pi Pico evaluation board comes with an external SWD debug connector (3 pins: SWCLK, GND, SWDIO). |
The Raspberry Pi Pico evaluation board comes with an external SWD debug connector (3 pins: SWCLK, GND, SWDIO). |
||
To set the board up with J-Link, the following steps are required: |
To set the board up with J-Link, the following steps are required: |
||
| Line 26: | Line 27: | ||
! Pin RP Pico !! Pin J-Link !! Signal |
! Pin RP Pico !! Pin J-Link !! Signal |
||
|- |
|- |
||
| − | | "DEBUG" SWCLK |
+ | | "DEBUG" "SWCLK" || 9 || SWCLK |
|- |
|- |
||
| − | | "DEBUG" GND |
+ | | "DEBUG" "GND" || 4 || GND |
|- |
|- |
||
| − | | "DEBUG" SWDIO |
+ | | "DEBUG" "SWDIO" || 7 || SWDIO |
|- |
|- |
||
| − | | Pad 36 |
+ | | "3V3" Pad 36 || 1 || VTref |
|} |
|} |
||
</li> |
</li> |
||
</ol> |
</ol> |
||
'''Note:''' For a more reliable, simpler solution, the [https://www.segger.com/products/debug-probes/j-link/accessories/adapters/segger-flying-wire-adapter/ SEGGER Flying Wire Adapter] is recommended. |
'''Note:''' For a more reliable, simpler solution, the [https://www.segger.com/products/debug-probes/j-link/accessories/adapters/segger-flying-wire-adapter/ SEGGER Flying Wire Adapter] is recommended. |
||
| + | |||
| + | ==Example Projects== |
||
| + | |||
| + | ===RAM Projects=== |
||
| + | Refer to [[Raspberry_Pi_RP2040#RAM_Projects | RAM Projects for the Raspberry Pi RP2040]]. |
||
| + | |||
| + | ===QSPI Projects=== |
||
| + | |||
| + | To run the following example projects the following prerequisites need to be met: |
||
| + | * [https://www.segger.com/downloads/jlink/#J-LinkSoftwareAndDocumentationPack J-Link software] V7.64e or later |
||
| + | * J-Link HW revision 11 or later (J-Link EDU Mini and J-Trace PRO V1 or later also supported) |
||
| + | * [https://www.segger.com/products/development-tools/embedded-studio/ SEGGER Embedded Studio for ARM] V6.30 or later |
||
| + | |||
| + | [[Media:RaspberryPi_Pico_QSPI_Blinky.zip | QSPI blinky]] |
||
Latest revision as of 14:48, 11 May 2022
The Raspberry Pi Pico is a Raspberry Pi RP2040 evaluation board. It is the first MCU evaluation board published by Raspberry Pi.
Contents
Features (selection)
- RP2040 MCU
- 2MB on board QSPI flash
- Micro USB-B 1.1
- Temperature sensor
- On board LED
- external debug connector pads
For further information please refer to the Rapberry Pi Pico web page
Setting up with J-Link
The Raspberry Pi Pico evaluation board comes with an external SWD debug connector (3 pins: SWCLK, GND, SWDIO). To set the board up with J-Link, the following steps are required:
- Solder a 3-pin pin strip to the debug connector pads.
-
Solder a pin Strip to the GPIO pads of the evaluation board. The relevant pad is Pad 36 (3V3(OUT))
-
Connect the J-Link to the evaluation board, using jumper wires as follows:
Pin RP Pico Pin J-Link Signal "DEBUG" "SWCLK" 9 SWCLK "DEBUG" "GND" 4 GND "DEBUG" "SWDIO" 7 SWDIO "3V3" Pad 36 1 VTref
Note: For a more reliable, simpler solution, the SEGGER Flying Wire Adapter is recommended.
Example Projects
RAM Projects
Refer to RAM Projects for the Raspberry Pi RP2040.
QSPI Projects
To run the following example projects the following prerequisites need to be met:
- J-Link software V7.64e or later
- J-Link HW revision 11 or later (J-Link EDU Mini and J-Trace PRO V1 or later also supported)
- SEGGER Embedded Studio for ARM V6.30 or later

