Renesas RZ/V2H
The Renesas RZ/V2H is an device featuring a Cortex-A55, a Cortex-M33 and two Cortex-R8 cores.
Contents
Flash Banks
QSPI Flash
QSPI flash programming requires special handling compared to internal flash. For more information about this, please see the QSPI Flash Programming Support article.
| Bank name | Base address | Maximum size | Supported pin configuration |
|---|---|---|---|
| External QSPI flash (secure) | 0x60000000 | 128 MB |
|
| External QSPI flash (non-secure) | 0x70000000 | 128 MB |
|
Multi-Core Support
Before proceeding with this article, please check out the generic article regarding Multi-Core debugging here.
The [DeviceFamily]family comes with a variety of multi-core options.
Some devices from this family feature a secondary core which is disabled after reset / by default.
In below, the debug related multi-core behavior of the J-Link is described for each core:
Cortex-A55
The core is not supported by the J-Link right now. If support is required, please get in touch with SEGGER.
Cortex-M33
Init/Setup
- The Cortex-M33 needs to be released from reset before we can use it. Several steps are required for this purpose including writing a valid boot application for the Cortex-M33 to the RAM.
- Debug authentication is supported, see Authentication
Reset
- Device specific reset is performed which toggles the reset pin + executes the entire Init/Setup procedure.
Attach
- Attach is not supported because the J-Link initializes the device on connect
Cortex-R8
Init/Setup
- If the main core session has not been started / debugging is not enabled yet, the secondary core executes the enable debug sequence.
- If the secondary core is already running, attach will be performed.
Reset
Warm reset as described in the reference manual is performed.
Attach
- Attach is supported / desired
Device Specific Handling
Authentication
The RZ/V2H supports different authentication levels. Depending on the authentication level, debug access can be granted if the correct key is passed. How this is possible is described below.
Specifying the authentication code using J-Link Command String
This is the recommended method as the specified authentication key will be used for the whole session. This way, the key needs not be specified multiple times (e.g. if a reset is performed). The J-Link Command String needs to be passed to the J-Link DLL before establishing the target connection. The J-Link Command String SetCPUConnectIDCode <AuthKey> has to be used (see example below).
Example authentication key:
- AuthenticationKey0: 0x01234567
- AuthenticationKey1: 0x89ABCDEF
- AuthenticationKey2: 0x00224466
- AuthenticationKey3: 0x88AABBCC
exec SetCPUConnectIDCODE 67452301EFCDAB8966442200CCBBAA88
Specifying the authentication code using the ID Code dialog
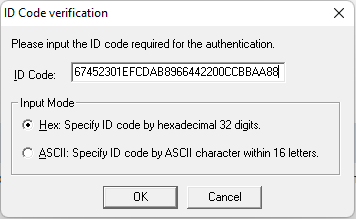
If the authentication key has not been specified using the Command String although it is required to enable debug access, the following message box will pop up which allows specifying the authentication key.
